前言
本文将介绍axios的相关操作。
相关的后端服务器是用Flask搭建的,仅用于演示:
web.py:
1
2
3
4
5
6
7
8
9
10
from flask import Flask,requestfrom flask_cors import CORS app = Flask(__name__) CORS(app, supports_credentials=True ) @app.route("/" if __name__=="__main__" : app.run()
说明:引入CORS库用于解决跨域问题。
以下的axios网络请求的代码都在Vue项目src文件夹下的main.js中完成。
这里也介绍一个网站,可以用于网络请求的测试:httpbin.org
axios
介绍
以下内容来自官网:axios中文文档|axios中文网 | axios (axios-js.com)
Axios 是一个基于 promise 的 HTTP 库,可以用在浏览器和 node.js 中。
特性:
支持多种请求方式:
axios.request(config)
axios.get(url[, config])
axios.delete(url[, config])
axios.head(url[, config])
axios.options(url[, config])
axios.post(url[, data[, config]])
axios.put(url[, data[, config]])
axios.patch(url[, data[, config]])
基本使用
配置axios
打开终端,进入项目根目录,键入如下命令(注意版本号):
1 npm install axios --save
导入
在使用的文件头中导入:
1 import axios from 'axios'
发送GET/POST请求
main.js:
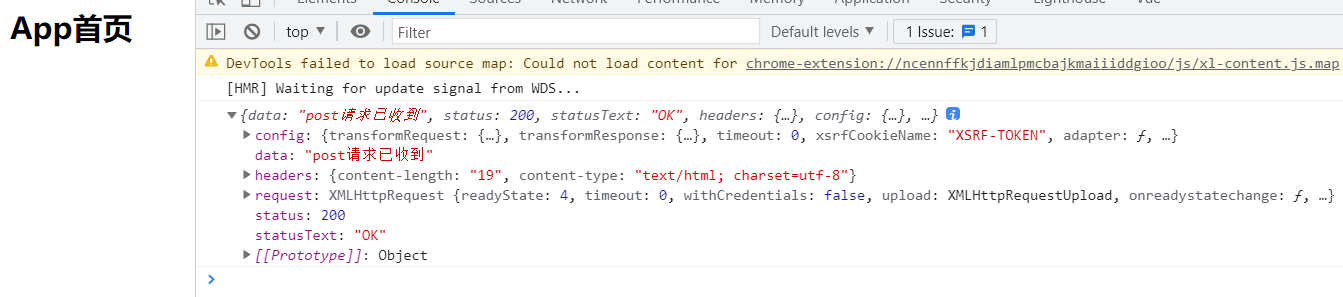
1
2
3
4
5
6
7
8
9
10
11
12
13
14
15
16
17
18
19
20
21
22
23
import Vue from 'vue' import App from './App' import axios from 'axios' Vue.config.productionTip = false new Vue({ el : '#app' , render : h => }) axios({ url : 'http://127.0.0.1:5000' , method : 'post' , params : { name : 'HuaZhu' , age : 18 } }).then((res ) => { console .log(res); })
说明:
(类似于ajax的使用方式)
axios的参数需要传入一个对象,该对象有以下属性:
url:用于指定请求的URL
method:用于指定请求方式(get、post),不写该参数默认使用get方式
params:用于附带参数信息
值得注意的是axios已集成Promise,在发送请求后会自动执行resolve()函数,因此可以在后面直接链接then()函数,用于接收请求返回值。
web.py:
1
2
3
4
5
6
7
8
9
10
11
12
13
14
15
16
17
18
19
20
21
22
23
from flask import Flask,requestfrom flask_cors import CORSapp = Flask(__name__) CORS(app, supports_credentials=True ) @app.route("/" ,methods=["GET" ,"POST" ] def test (): if request.method=="GET" : name = request.args.get("name" ) age = request.args.get("age" ) print (name,age) return "get请求已收到" elif request.method=="POST" : name = request.values.get("name" ) age = request.values.get("age" ) print (name,age) return "post请求已收到" else : return "网络请求方式不正确" if __name__=="__main__" : app.run()
效果展示:
发送并发请求
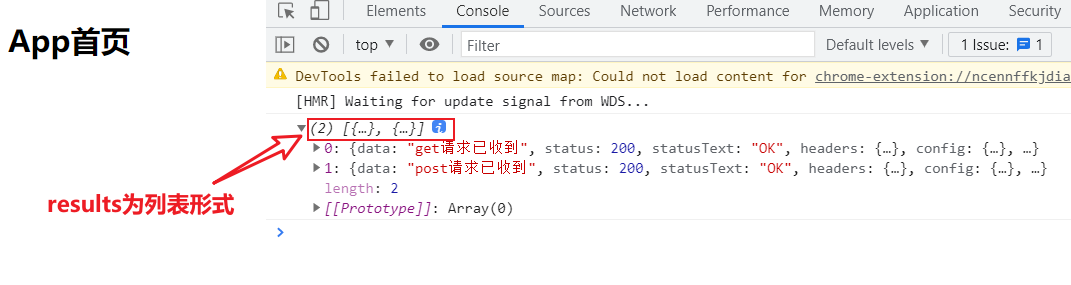
如果需要向服务器同时发送多个并发请求,并取回每个请求的结果,然后对这些返回结果操作。axios提供了axios.all()方法,使用格式如下:
axios.all([axios(), axios()], ...).then((results) => {...})
说明:
axios.all()的参数为列表,里面可以写任意个axios()方法最后then()获得的返回值同为列表形式,里面存放了每一个请求的结果
现在假设要向服务器同时发送get和post请求,并拿到返回值:
main.js:
1
2
3
4
5
6
7
8
9
10
11
12
13
14
15
16
17
18
19
20
21
22
23
24
25
26
27
28
29
import Vue from 'vue' import App from './App' import axios from 'axios' Vue.config.productionTip = false new Vue({ el : '#app' , render : h => }) axios.all([axios({ url : 'http://127.0.0.1:5000' , method : 'get' , params : { name : 'HuaZhu' , age : 18 } }), axios({ url : 'http://127.0.0.1:5000' , method : 'post' , params : { name : 'HuaZhu' , age : 18 } })]).then(results => console .log(results) })
web.py:
1
2
3
4
5
6
7
8
9
10
11
12
13
14
15
16
17
18
19
20
21
22
23
from flask import Flask,requestfrom flask_cors import CORSapp = Flask(__name__) CORS(app, supports_credentials=True ) @app.route("/" ,methods=["GET" ,"POST" ] def test (): if request.method=="GET" : name = request.args.get("name" ) age = request.args.get("age" ) print (name,age) return "get请求已收到" elif request.method=="POST" : name = request.values.get("name" ) age = request.values.get("age" ) print (name,age) return "post请求已收到" else : return "网络请求方式不正确" if __name__=="__main__" : app.run()
效果展示:
返回结果列表拿到,如果要详细访问,可以通过列表的index下标值。但是axios还提供了axios.spread()方法可以直接拆分返回结果列表,拿到具体的结果:
1
2
3
4
5
6
7
8
9
10
11
12
13
14
15
16
17
18
axios.all([axios({ url : 'http://127.0.0.1:5000' , method : 'get' , params : { name : 'HuaZhu' , age : 18 } }), axios({ url : 'http://127.0.0.1:5000' , method : 'post' , params : { name : 'HuaZhu' , age : 18 } })]).then(axios.spread((res1, res2 ) => { console .log(res1); console .log(res2); }))
效果如下:
配置信息
基本配置
可以在axios对象中添加诸如baseURL、timeout等的配置信息:
1
2
3
4
5
6
7
8
9
10
11
12
axios({ baseURL : 'http://127.0.0.1:5000' , url : '/home' , timeout : 5000 , method : 'post' , params : { name : 'HuaZhu' , age : 18 } }).then((res ) => { console .log(res); })
全局配置
如果想在多个请求中使用同一配置,可以将这些配置信息抽离出来,设置全局默认配置:axios.defaults.xxx
1
2
3
4
5
6
7
8
9
10
11
12
13
axios.defaults.baseURL = 'http://127.0.0.1:5000' axios.defaults.timeout = 5000 axios({ url : '/home' , method : 'post' , params : { name : 'HuaZhu' , age : 18 } }).then((res ) => { console .log(res); })
axios实例
全局默认配置在项目规模较小的情况下(请求配置基本一致)可以使用,一旦涉及到的请求量增加,面临的情况可能是一类请求需要一种配置,另一类请求需要另外一种配置,如果这时再设置全局默认配置就不是很合适了。为此可以使用axios实例:axios.create()
1
2
3
4
5
6
7
8
9
10
11
12
13
14
15
16
17
18
19
20
21
22
23
24
25
26
27
28
29
30
31
32
33
34
35
36
37
const instance1 = axios.create({ baseURL : 'http://127.0.0.1:5000' , timeout : 5000 }) instance1({ url : '/home' , method : 'get' , }).then((res ) => { console .log(res); }) instance1({ url : '/about' , method : 'post' , }).then((res ) => { console .log(res); }) const instance2 = axios.create({ baseURL : 'http://127.0.0.1:8080' , timeout : 10000 }) instance2({ url : '/home' , method : 'get' , }).then((res ) => { console .log(res); }) instance2({ url : '/about' , method : 'post' , }).then((res ) => { console .log(res); })
常见的配置信息:
配置信息
格式
请求地址
url: ‘/home’
请求类型
method: ‘get’
请求根路径
baseURL: ‘http://127.0.0.1:5000 ’
请求前的数据处理
transformRequest:[function(data){}]
请求后的数据处理
transformResponse: [function(data){}]
自定义的请求头
headers:{‘x-Requested-With’:‘XMLHttpRequest’}
URL查询对象
params:{ name: ‘HuaZhu’, age: 18 }
查询对象序列化函数
paramsSerializer: function(params){ }
request body
data: { key: ‘a’}
超时设置(ms)
timeout: 1000
跨域是否带Token
withCredentials: false
自定义请求处理
adapter: function(resolve, reject, config){}
身份验证信息
auth: { uname: ‘’, pwd: ‘12’}
响应的数据格式 json / blob /document /arraybuffer / text / stream
responseType: ‘json’
axios封装
在大型项目中,往往第三方库在大量使用的情况下最好进行封装,在调用的时候只使用自己封装的内容就好。原因:如果第三方库停止维护,方便改用其他的代替内容。修改起来仅需改动封装的部分代码就好。
在项目的src文件夹下新建一个network文件夹,用于存放网络相关的封装代码。在其中新建名为axios-request.js的文件:
1
2
3
4
5
6
7
8
9
10
11
12
import axios from 'axios' export function axios_request (config ) const instance = axios.create({ baseURL : 'http://127.0.0.1:5000' , timeout : 5000 }) return instance(config) }
假设未来决定不再使用axios,改用其他的第三方库,如果该库也自动集成Promise,那调用格式同上,如果没有,那么就需要手动返回一个Promise对象:
1
2
3
4
5
6
7
8
import xxx_request from 'xxx' export function xxx_request (config ) return new Promise ((resolve, reject ) => { }) }
在其他文件中就可以直接调用封装的axios_request(config)函数,其中config就是发送请求的配置信息:
main.js:
1
2
3
4
5
6
7
8
9
10
11
12
13
14
15
16
17
18
19
20
21
22
23
24
import Vue from 'vue' import App from './App' import {axios_request} from './network/axios-request' Vue.config.productionTip = false new Vue({ el : '#app' , render : h => }) axios_request({ url : '/home' , method : 'post' , params : { name : 'HuaZhu' , age : 18 } }).then((res ) => { console .log(res); }).catch((err ) => { console .log(err); })
说明:
由于axios.create()实例对象集成Promise,在调用时会自动执行resolve()函数,因而可以在使用封装函数后直接调用then()和catch()函数。
web.py:
1
2
3
4
5
6
7
8
9
10
11
12
13
14
15
16
17
18
19
20
21
22
23
from flask import Flask,requestfrom flask_cors import CORSapp = Flask(__name__) CORS(app, supports_credentials=True ) @app.route("/home" ,methods=["GET" ,"POST" ] def test (): if request.method=="GET" : name = request.args.get("name" ) age = request.args.get("age" ) print (name,age) return "get请求已收到" elif request.method=="POST" : name = request.values.get("name" ) age = request.values.get("age" ) print (name,age) return "post请求已收到" else : return "网络请求方式不正确" if __name__=="__main__" : app.run()
拦截器
axios提供了拦截器,用于在发送每次请求或者从服务器得到返回结果时,进行相应的处理。
请求拦截
作用:
当发送网络请求时,在页面中添加一个loading组件,作为加载动画
某些请求要求用户必须登录,判断用户是否有token(令牌),如果没有则跳转到login页面
对请求的参数进行序列化
…
格式:
局部拦截器:instance.interceptors.request.use(onFulfilled(), onRejected())
全局拦截器:axios.interceptors.request.use(onFulfilled(), onRejected())
axios-request.js:
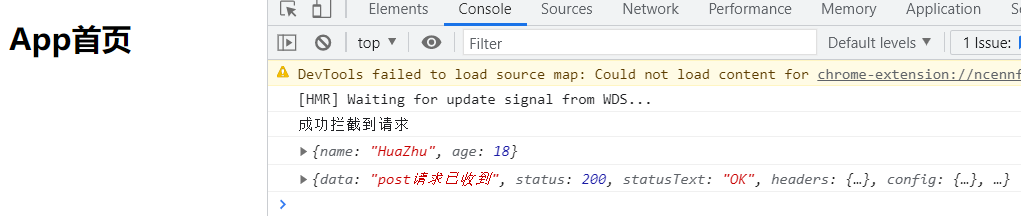
1
2
3
4
5
6
7
8
9
10
11
12
13
14
15
16
17
18
19
20
21
22
23
import axios from 'axios' export function axios_request (config ) const instance = axios.create({ baseURL : 'http://127.0.0.1:5000' , timeout : 5000 }) instance.interceptors.request.use(config => console .log('成功拦截到请求' ); console .log(config.params) return config }, err => console .log('拦截请求失败' ); return err }) return instance(config) }
main.js:
1
2
3
4
5
6
7
8
9
10
11
12
13
14
15
16
17
18
19
20
21
22
23
24
import Vue from 'vue' import App from './App' import {axios_request} from './network/axios-request' Vue.config.productionTip = false new Vue({ el : '#app' , render : h => }) axios_request({ url : '/home' , method : 'post' , params : { name : 'HuaZhu' , age : 18 } }).then((res ) => { console .log(res); }).catch((err ) => { console .log(err); })
web.py:
1
2
3
4
5
6
7
8
9
10
11
12
13
14
15
16
17
18
19
20
21
22
23
from flask import Flask,requestfrom flask_cors import CORSapp = Flask(__name__) CORS(app, supports_credentials=True ) @app.route("/home" ,methods=["GET" ,"POST" ] def test (): if request.method=="GET" : name = request.args.get("name" ) age = request.args.get("age" ) print (name,age) return "get请求已收到" elif request.method=="POST" : name = request.values.get("name" ) age = request.values.get("age" ) print (name,age) return "post请求已收到" else : return "网络请求方式不正确" if __name__=="__main__" : app.run()
效果展示:
返回结果拦截
作用:
主要是对返回的结果进行过滤
相应失败后根据错误信息做出不同的响应
…
格式:
局部拦截器:instance.interceptors.response.use(onFulfilled(), onRejected())
全局拦截器:axios.interceptors.response.use(onFulfilled(), onRejected())
axios-request.js:
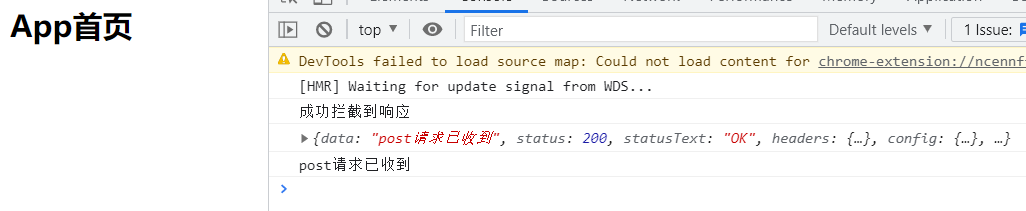
1
2
3
4
5
6
7
8
9
10
11
12
13
14
15
16
17
18
19
20
21
22
import axios from 'axios' export function axios_request (config ) const instance = axios.create({ baseURL : 'http://127.0.0.1:5000' , timeout : 5000 }) instance.interceptors.response.use(response => console .log('成功拦截到响应' ); console .log(response) return response.data }, err => console .log('拦截响应失败' ); return err }) return instance(config) }
效果展示:
后记
要在项目实战中多运用练习以加深印象。