前言
本篇介绍Spring Jdbc模板的使用。
项目搭建
利用Maven新建一个Javaweb项目,结构如下:
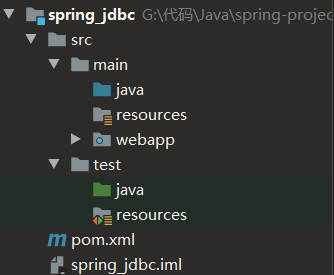
在pom.xml配置文件中添加依赖:
1
2
3
4
5
6
7
8
9
10
11
12
13
14
15
16
17
18
19
20
21
22
23
24
25
26
27
28
29
30
31
32
33
34
35
36
37
38
39
40
41
42
43
44
45
46
47
48
49
50
51
52
53
54
55
56
57
58
59
60
61
62
63
64
65
66
67
68
69
70
71
72
73
74
75
76
77
78
79
80
81
82
83
84
85
86
87
88
89
90
91
92
93
| <dependencies>
<dependency>
<groupId>mysql</groupId>
<artifactId>mysql-connector-java</artifactId>
<version>8.0.21</version>
</dependency>
<dependency>
<groupId>c3p0</groupId>
<artifactId>c3p0</artifactId>
<version>0.9.1.2</version>
</dependency>
<dependency>
<groupId>com.alibaba</groupId>
<artifactId>druid</artifactId>
<version>1.1.10</version>
</dependency>
<dependency>
<groupId>junit</groupId>
<artifactId>junit</artifactId>
<version>4.11</version>
</dependency>
<dependency>
<groupId>junit</groupId>
<artifactId>junit</artifactId>
<version>4.12</version>
<scope>test</scope>
</dependency>
<dependency>
<groupId>org.springframework</groupId>
<artifactId>spring-context</artifactId>
<version>5.0.5.RELEASE</version>
</dependency>
<dependency>
<groupId>org.springframework</groupId>
<artifactId>spring-test</artifactId>
<version>5.0.5.RELEASE</version>
</dependency>
<dependency>
<groupId>org.springframework</groupId>
<artifactId>spring-web</artifactId>
<version>5.0.5.RELEASE</version>
</dependency>
<dependency>
<groupId>org.springframework</groupId>
<artifactId>spring-webmvc</artifactId>
<version>5.0.5.RELEASE</version>
</dependency>
<dependency>
<groupId>javax.servlet</groupId>
<artifactId>javax.servlet-api</artifactId>
<version>3.0.1</version>
</dependency>
<dependency>
<groupId>javax.servlet.jsp</groupId>
<artifactId>javax.servlet.jsp-api</artifactId>
<version>2.2.1</version>
</dependency>
<dependency>
<groupId>com.fasterxml.jackson.core</groupId>
<artifactId>jackson-core</artifactId>
<version>2.9.0</version>
</dependency>
<dependency>
<groupId>com.fasterxml.jackson.core</groupId>
<artifactId>jackson-databind</artifactId>
<version>2.9.0</version>
</dependency>
<dependency>
<groupId>com.fasterxml.jackson.core</groupId>
<artifactId>jackson-annotations</artifactId>
<version>2.9.0</version>
</dependency>
<dependency>
<groupId>commons-fileupload</groupId>
<artifactId>commons-fileupload</artifactId>
<version>1.3.1</version>
</dependency>
<dependency>
<groupId>commons-io</groupId>
<artifactId>commons-io</artifactId>
<version>2.3</version>
</dependency>
<dependency>
<groupId>org.springframework</groupId>
<artifactId>spring-jdbc</artifactId>
<version>5.0.5.RELEASE</version>
</dependency>
<dependency>
<groupId>org.springframework</groupId>
<artifactId>spring-tx</artifactId>
<version>5.0.5.RELEASE</version>
</dependency>
</dependencies>
|
在MySQL中新建test数据库,在其中新建表account,其中包含name(varchar)和money(double)两个字段:

在/src/test/java/jdbc目录下新建domain文件夹,里面新建Account类:
1
2
3
4
5
6
7
8
9
10
11
12
13
14
15
16
17
18
19
20
21
22
23
24
25
26
27
28
| public class Account {
private String name;
private double money;
public String getName() {
return name;
}
public void setName(String name) {
this.name = name;
}
public double getMoney() {
return money;
}
public void setMoney(double money) {
this.money = money;
}
@Override
public String toString() {
return "Account{" +
"name='" + name + '\'' +
", money=" + money +
'}';
}
}
|
在/src/test/java/jdbc目录新建test文件夹,里面编写JdbcTemplateTest测试类:
1
2
3
4
5
6
7
8
9
10
11
12
13
14
15
16
17
18
19
20
21
22
23
24
25
| import com.mchange.v2.c3p0.ComboPooledDataSource;
import org.junit.Test;
import org.springframework.jdbc.core.JdbcTemplate;
import java.beans.PropertyVetoException;
public class JdbcTemplateTest {
@Test
public void test1() throws PropertyVetoException {
ComboPooledDataSource dataSource = new ComboPooledDataSource();
dataSource.setDriverClass("com.mysql.cj.jdbc.Driver");
dataSource.setJdbcUrl("jdbc:mysql://localhost:3306/test?useUnicode=true&characterEncoding=utf-8&serverTimezone=Asia/Shanghai");
dataSource.setUser("root");
dataSource.setPassword("root");
JdbcTemplate jdbcTemplate = new JdbcTemplate();
jdbcTemplate.setDataSource(dataSource);
int row = jdbcTemplate.update("insert into account values(?,?)","HuaZhu",8000);
System.out.println(row);
}
}
|
说明:
- 首先创建数据源对象( ComboPooledDataSource)
- 然后创建JdbcTemplate对象,绑定数据源
- 最后执行操作
运行测试代码:
可以看到控制台打印输出“1”:

数据库的account表刷新后看到更新数据:

Spring生成JdbcTemplate对象
可以将JdbcTemplate的创建权交给Spring,将数据源DataSource的创建权也交给Spring,在Spring容器内部将数据源DataSource注入到JdbcTemplate模版对象中。
在/src/test/resources目录下新建applicationContext.xml配置文件:
1
2
3
4
5
6
7
8
9
10
11
12
13
14
15
16
17
18
19
| <?xml version="1.0" encoding="UTF-8"?>
<beans xmlns="http://www.springframework.org/schema/beans"
xmlns:xsi="http://www.w3.org/2001/XMLSchema-instance"
xsi:schemaLocation="http://www.springframework.org/schema/beans http://www.springframework.org/schema/beans/spring-beans.xsd">
<bean id="dataSource" class="com.mchange.v2.c3p0.ComboPooledDataSource">
<property name="driverClass" value="com.mysql.cj.jdbc.Driver"></property>
<property name="jdbcUrl" value="jdbc:mysql://localhost:3306/test?useUnicode=true&characterEncoding=utf-8&serverTimezone=Asia/Shanghai"></property>
<property name="user" value="root"></property>
<property name="password" value="root"></property>
</bean>
<bean id="jdbcTemplate" class="org.springframework.jdbc.core.JdbcTemplate">
<property name="dataSource" ref="dataSource"></property>
</bean>
</beans>
|
在其中创建数据源对象和jdbc模板对象,并将数据源注入到jdbc模板中
在JdbcTemplateTest测试类中编写测试方法:
1
2
3
4
5
6
7
8
9
10
| public class JdbcTemplateTest {
@Test
public void test2() {
ApplicationContext app = new ClassPathXmlApplicationContext("applicationContext.xml");
JdbcTemplate jdbcTemplate = app.getBean(JdbcTemplate.class);
int row = jdbcTemplate.update("insert into account values(?,?)","HuaZhu",10000);
System.out.println(row);
}
}
|
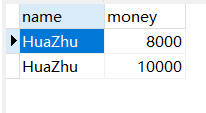
执行测试方法,可以看到数据库更新结果:
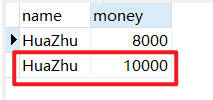
当然也可以将数据源配置与applicationContext.xml抽离开来,在在/src/test/resources目录下新建jdbc.properties配置文件:
1
2
3
4
| jdbc.driver=com.mysql.cj.jdbc.Driver
jdbc.url=jdbc:mysql://localhost:3306/test?useUnicode=true&characterEncoding=utf-8&serverTimezone=Asia/Shanghai
jdbc.username=root
jdbc.password=root
|
更改applicationContext.xml配置文件:
1
2
3
4
5
6
7
8
9
10
11
12
13
14
15
16
17
18
19
20
21
22
23
24
| <?xml version="1.0" encoding="UTF-8"?>
<beans xmlns="http://www.springframework.org/schema/beans"
xmlns:xsi="http://www.w3.org/2001/XMLSchema-instance"
xmlns:context="http://www.springframework.org/schema/context"
xsi:schemaLocation="http://www.springframework.org/schema/beans http://www.springframework.org/schema/beans/spring-beans.xsd
http://www.springframework.org/schema/context http://www.springframework.org/schema/context/spring-context.xsd">
<context:property-placeholder location="classpath:jdbc.properties"></context:property-placeholder>
<bean id="dataSource" class="com.mchange.v2.c3p0.ComboPooledDataSource">
<property name="driverClass" value="${jdbc.driver}"></property>
<property name="jdbcUrl" value="${jdbc.url}"></property>
<property name="user" value="${jdbc.username}"></property>
<property name="password" value="${jdbc.password}"></property>
</bean>
<bean id="jdbcTemplate" class="org.springframework.jdbc.core.JdbcTemplate">
<property name="dataSource" ref="dataSource"></property>
</bean>
</beans>
|
基本操作
这里利用Spring集成Junit测试进行操作。
在/src/test/java/jdbc/test,里面编写jdbcTemplateCRUDTest测试类:
1
2
3
4
5
6
7
8
9
10
11
12
13
14
15
| import org.junit.Test;
import org.junit.runner.RunWith;
import org.springframework.beans.factory.annotation.Autowired;
import org.springframework.jdbc.core.JdbcTemplate;
import org.springframework.test.context.ContextConfiguration;
import org.springframework.test.context.junit4.SpringJUnit4ClassRunner;
@RunWith(SpringJUnit4ClassRunner.class)
@ContextConfiguration("classpath:applicationContext.xml")
public class jdbcTemplateCRUDTest {
@Autowired
private JdbcTemplate jdbcTemplate;
}
|
更新操作
jdbcTemplate.update (sql,params)
增添
1
2
3
4
5
6
7
8
9
10
11
12
| @RunWith(SpringJUnit4ClassRunner.class)
@ContextConfiguration("classpath:applicationContext.xml")
public class jdbcTemplateCRUDTest {
@Autowired
private JdbcTemplate jdbcTemplate;
@Test
public void testUpdate() {
jdbcTemplate.update("insert into account values(?,?)","ZhangSan",1000);
}
}
|
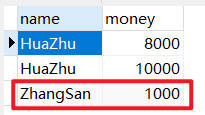
刷新数据库,可以看到插入结果:
修改
1
2
3
4
5
6
7
8
9
10
11
12
13
| @RunWith(SpringJUnit4ClassRunner.class)
@ContextConfiguration("classpath:applicationContext.xml")
public class jdbcTemplateCRUDTest {
@Autowired
private JdbcTemplate jdbcTemplate;
@Test
public void testUpdate() {
jdbcTemplate.update("update account set money=? where name=?",500,"ZhangSan");
}
}
|
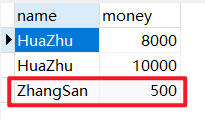
刷新数据库,可以看到修改结果:
删除
1
2
3
4
5
6
7
8
9
10
11
12
13
| @RunWith(SpringJUnit4ClassRunner.class)
@ContextConfiguration("classpath:applicationContext.xml")
public class jdbcTemplateCRUDTest {
@Autowired
private JdbcTemplate jdbcTemplate;
@Test
public void testDelete() {
jdbcTemplate.update("delete from account where name=?","ZhangSan");
}
}
|
刷新数据库,可以看到删除结果:
查询操作
jdbcTemplate.query (sql,Mapper,params)
jdbcTemplate.queryForObject(sql,Mapper,params)
查询全部对象
1
2
3
4
5
6
7
8
9
10
11
12
13
14
| @RunWith(SpringJUnit4ClassRunner.class)
@ContextConfiguration("classpath:applicationContext.xml")
public class jdbcTemplateCRUDTest {
@Autowired
private JdbcTemplate jdbcTemplate;
@Test
public void testQueryAll() {
List<Account> accountList = jdbcTemplate.query("select * from account", new BeanPropertyRowMapper<Account>(Account.class));
System.out.println(accountList);
}
}
|
说明:之前写过一个Account类,将查询的结果直接封装为Account对象的集合
查询结果如下:

查询单个对象
1
2
3
4
5
6
7
8
9
10
11
12
13
14
| @RunWith(SpringJUnit4ClassRunner.class)
@ContextConfiguration("classpath:applicationContext.xml")
public class jdbcTemplateCRUDTest {
@Autowired
private JdbcTemplate jdbcTemplate;
@Test
public void testQueryOne() {
Account account = jdbcTemplate.queryForObject("select * from account where money=?", new BeanPropertyRowMapper<Account>(Account.class), 8000);
System.out.println(account);
}
}
|
查询工资为8000的员工,查询结果如下:

聚合查询
1
2
3
4
5
6
7
8
9
10
11
12
13
14
| @RunWith(SpringJUnit4ClassRunner.class)
@ContextConfiguration("classpath:applicationContext.xml")
public class jdbcTemplateCRUDTest {
@Autowired
private JdbcTemplate jdbcTemplate;
@Test
public void testQueryCount() {
Long count = jdbcTemplate.queryForObject("select count(*) from account", Long.class);
System.out.println(count);
}
}
|
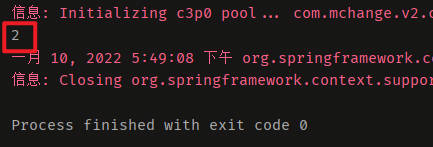
查询员工总数,查询结果如下:
后记
无


