前言 介绍SpringBoot数据库相关操作。
版本:
Maven:3.6.1
JDK:1.8
SpringBoot:2.3.4
MySQL:8.0.20
使用maven新建一个SpringBoot项目,添加的依赖如下:
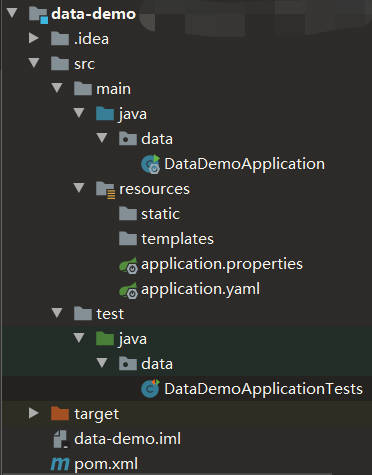
项目结构如下:
创建使用application.yaml配置文件
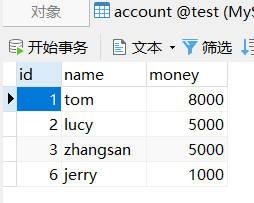
在MySQL中存在test数据库,内有一个account表,其中包含id(int)、name(varchar)和money(double)三个字段:
数据访问 SQL 在pom.xml配置文件中手动导入JDBC以及MySQL的依赖:
1 2 3 4 5 6 7 8 <dependency > <groupId > org.springframework.boot</groupId > <artifactId > spring-boot-starter-data-jdbc</artifactId > </dependency > <dependency > <groupId > mysql</groupId > <artifactId > mysql-connector-java</artifactId > </dependency >
说明:
mysql默认做了最新的版本配置
两种方式修改mysql的版本:
修改application.yaml配置文件,添加数据库的相关信息:
1 2 3 4 5 6 spring: datasource: url: jdbc:mysql://localhost:3306/test?useUnicode=true&characterEncoding=utf-8&serverTimezone=Asia/Shanghai username: root password: root driver-class-name: com.mysql.cj.jdbc.Driver
也可以配置jdbc的相关设置,如查询超时时间(单位:秒):
1 2 3 4 5 6 7 8 9 spring: datasource: url: jdbc:mysql://localhost:3306/test?useUnicode=true&characterEncoding=utf-8&serverTimezone=Asia/Shanghai username: root password: root driver-class-name: com.mysql.cj.jdbc.Driver jdbc: template: query-timeout: 4
测试,编辑src/test/java/data目录下的DataDemoApplicationTests测试类:
1 2 3 4 5 6 7 8 9 10 11 12 13 14 15 16 17 18 19 20 import lombok.extern.slf4j.Slf4j;import org.junit.jupiter.api.Test;import org.springframework.beans.factory.annotation.Autowired;import org.springframework.boot.test.context.SpringBootTest;import org.springframework.jdbc.core.JdbcTemplate;@Slf4j @SpringBootTest class DataDemoApplicationTests @Autowired JdbcTemplate jdbcTemplate; @Test void contextLoads () Long aLong = jdbcTemplate.queryForObject("select count(*) from account" , Long.class); log.info("记录总数:{}" ,aLong); } }
执行测试,可以看到查询account表的记录总数:
以上是SpringBoot自动配置了HikariDataSource数据源
使用Druid数据源 手动配置 在pom.xml配置文件中引入druid依赖:
1 2 3 4 5 <dependency > <groupId > com.alibaba</groupId > <artifactId > druid</artifactId > <version > 1.1.17</version > </dependency >
在src/main/java/data目录下创建config文件夹,并在其中编写MyDataSourceConfig配置类:
1 2 3 4 5 6 7 8 9 10 11 12 13 14 15 16 17 18 19 import com.alibaba.druid.pool.DruidDataSource;import org.springframework.boot.context.properties.ConfigurationProperties;import org.springframework.boot.web.servlet.ServletRegistrationBean;import org.springframework.context.annotation.Bean;import org.springframework.context.annotation.Configuration;import javax.sql.DataSource;@Configuration public class MyDataSourceConfig @ConfigurationProperties("spring.datasource") @Bean public DataSource dataSource () DruidDataSource druidDataSource = new DruidDataSource(); return druidDataSource; } }
编写DataDemoApplicationTests测试类:
1
2
3
4
5
6
7
8
9
10
11
12
13
14
15
16
17
18
19
20
import lombok.extern.slf4j.Slf4j;import org.junit.jupiter.api.Test;import org.springframework.beans.factory.annotation.Autowired;import org.springframework.boot.test.context.SpringBootTest;import org.springframework.jdbc.core.JdbcTemplate;import javax.sql.DataSource;@Slf4j @SpringBootTest class DataDemoApplicationTests @Autowired DataSource dataSource; @Test void contextLoads () log.info("数据源类型:{}" ,dataSource.getClass()); } }
执行测试,可以看到打印出自定义数据源:
starter方式
Druid官方文档:https://github.com/alibaba/druid
在pom.xml配置文件中引入druid依赖:
1 2 3 4 5 <dependency > <groupId > com.alibaba</groupId > <artifactId > druid-spring-boot-starter</artifactId > <version > 1.1.17</version > </dependency >
可以根据官方文档进行配置,application.yaml配置示例:
1 2 3 4 5 6 7 8 9 10 11 12 13 14 15 16 17 18 19 20 21 22 23 24 25 26 27 28 29 30 31 spring: datasource: url: jdbc:mysql://localhost:3306/test?useUnicode=true&characterEncoding=utf-8&serverTimezone=Asia/Shanghai username: root password: root driver-class-name: com.mysql.cj.jdbc.Driver druid: aop-patterns: com.atguigu.admin.* filters: stat,wall stat-view-servlet: enabled: true login-username: admin login-password: admin resetEnable: false web-stat-filter: enabled: true urlPattern: /* exclusions: '*.js,*.gif,*.jpg,*.png,*.css,*.ico,/druid/*' filter: stat: slow-sql-millis: 1000 logSlowSql: true enabled: true wall: enabled: true config: drop-table-allow: false
整合MyBatis操作 配置模式 在pom.xml配置文件中引入MyBatis:
1 2 3 4 5 <dependency > <groupId > org.mybatis.spring.boot</groupId > <artifactId > mybatis-spring-boot-starter</artifactId > <version > 2.1.4</version > </dependency >
也可以在创建项目时勾选MyBatis Framework选项
在src/main/java/data目录下新建bean文件夹,并在其中编写Account类:
1 2 3 4 5 6 7 8 import lombok.Data;@Data public class Account private Integer id; private String name; private Integer money; }
在src/main/java/data目录下新建mapper文件夹,并在其中编写AccountMapper接口:
1 2 3 4 5 6 7 8 import data.bean.Account;import org.apache.ibatis.annotations.Mapper;@Mapper public interface AccountMapper public Account getAcct (Integer id) }
在src/main/java/data目录下新建service文件夹,并在其中编写AccountService类:
1 2 3 4 5 6 7 8 9 10 11 12 13 14 15 import data.bean.Account;import data.mapper.AccountMapper;import org.springframework.beans.factory.annotation.Autowired;import org.springframework.stereotype.Service;@Service public class AccountService @Autowired AccountMapper accountMapper; public Account getAcctById (Integer id) return accountMapper.getAcct(id); } }
在src/main/resources目录下创建mybatis文件夹,在其中创建mybatis-config.xml全局配置文件:
1 2 3 4 5 6 7 <?xml version="1.0" encoding="UTF-8" ?> <!DOCTYPE configuration PUBLIC "-//mybatis.org//DTD Config 3.0//EN" "http://mybatis.org/dtd/mybatis-3-config.dtd" > <configuration > </configuration >
在src/main/resources/mybatis目录下创建mapper文件夹,在其中创建AccountMapper.xmlsql映射文件:
1 2 3 4 5 6 7 8 9 <?xml version="1.0" encoding="UTF-8" ?> <!DOCTYPE mapper PUBLIC "-//mybatis.org//DTD Mapper 3.0//EN" "http://mybatis.org/dtd/mybatis-3-mapper.dtd" > <mapper namespace ="data.mapper.AccountMapper" > <select id ="getAcct" resultType ="data.bean.Account" > select * from account where id=#{id} </select > </mapper >
在src/main/java/data目录下新建controller文件夹,并在其中编写accountController类:
1 2 3 4 5 6 7 8 9 10 11 12 13 14 15 16 17 18 19 20 21 22 23 import data.bean.Account;import data.service.AccountService;import lombok.extern.slf4j.Slf4j;import org.springframework.beans.factory.annotation.Autowired;import org.springframework.stereotype.Controller;import org.springframework.web.bind.annotation.GetMapping;import org.springframework.web.bind.annotation.RequestParam;import org.springframework.web.bind.annotation.ResponseBody;@Slf4j @Controller public class AccountController @Autowired AccountService accountService; @ResponseBody @GetMapping("/acct") public Account getById (@RequestParam("id") Integer id) return accountService.getAcctById(id); } }
配置application.yaml配置文件:
1 2 3 4 5 6 7 8 9 10 11 spring: datasource: url: jdbc:mysql://localhost:3306/test?useUnicode=true&characterEncoding=utf-8&serverTimezone=Asia/Shanghai username: root password: root driver-class-name: com.mysql.cj.jdbc.Driver mybatis: config-location: classpath:mybatis/mybatis-config.xml mapper-locations: classpath:mybatis/mapper/*.xml
说明:
更为常用的办法是删除全局配置文件,直接在application.yaml中进行配置:
1 2 3 4 5 6 7 8 9 10 11 12 spring: datasource: url: jdbc:mysql://localhost:3306/test?useUnicode=true&characterEncoding=utf-8&serverTimezone=Asia/Shanghai username: root password: root driver-class-name: com.mysql.cj.jdbc.Driver mybatis: mapper-locations: classpath:mybatis/mapper/*.xml configuration: ...
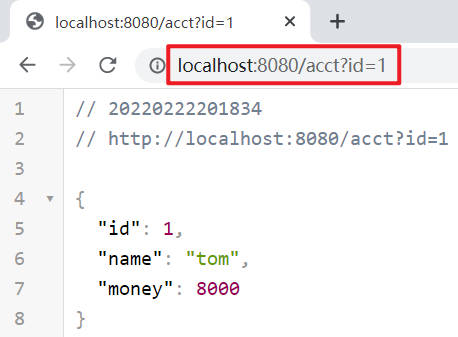
测试,启动服务,浏览器访问:http://localhost:8080/acct?id=1
注解模式 在pom.xml配置文件中引入MyBatis:
1 2 3 4 5 <dependency > <groupId > org.mybatis.spring.boot</groupId > <artifactId > mybatis-spring-boot-starter</artifactId > <version > 2.1.4</version > </dependency >
首先在test数据库内新建一个city表,其中包含id(int)、name(varchar)、state(varchar)和country(varchar)四个字段:
在src/main/java/data/bean目录下编写City类:
1 2 3 4 5 6 7 8 9 import lombok.Data;@Data public class City private Integer id; private String name; private String state; private String country; }
在src/main/java/data/mapper目录下编写CityMapper接口:
1 2 3 4 5 6 7 8 9 10 import data.bean.City;import org.apache.ibatis.annotations.Mapper;import org.apache.ibatis.annotations.Select;@Mapper public interface CityMapper @Select("select * from city where id=#{id}") public City getById (Integer id) }
在src/main/java/data/service目录下编写CityService类:
1 2 3 4 5 6 7 8 9 10 11 12 13 14 15 import data.bean.City;import data.mapper.CityMapper;import org.springframework.beans.factory.annotation.Autowired;import org.springframework.stereotype.Service;@Service public class CityService @Autowired CityMapper cityMapper; public City getById (Integer id) return cityMapper.getById(id); } }
在src/main/java/data/controller目录下编写CityController类:
1 2 3 4 5 6 7 8 9 10 11 12 13 14 15 16 17 18 19 20 21 22 import data.bean.City;import data.service.CityService;import lombok.extern.slf4j.Slf4j;import org.springframework.beans.factory.annotation.Autowired;import org.springframework.stereotype.Controller;import org.springframework.web.bind.annotation.GetMapping;import org.springframework.web.bind.annotation.RequestParam;import org.springframework.web.bind.annotation.ResponseBody;@Slf4j @Controller public class CityController @Autowired CityService cityService; @ResponseBody @GetMapping("/city") public City getCityById (@RequestParam("id") Integer id) return cityService.getById(id); } }
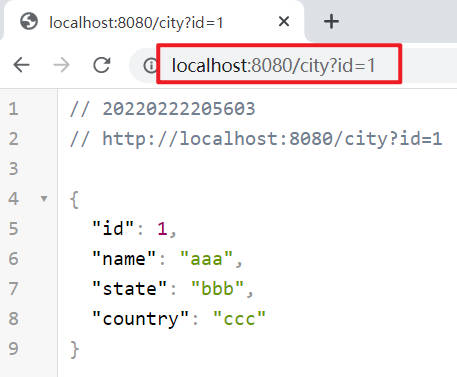
测试,启动服务,浏览器访问:http://localhost:8080/city?id=1
混合模式 如果单纯使用注解太繁琐,可以结合配置文件一起使用。
编写CityMapper接口:
1 2 3 4 5 6 7 8 9 10 11 12 import data.bean.City;import org.apache.ibatis.annotations.Mapper;import org.apache.ibatis.annotations.Select;@Mapper public interface CityMapper @Select("select * from city where id=#{id}") public City getById (Integer id) public void insert (City city) }
在src/main/resources/mybatis/mapper目录中编写CityMapper.xml配置文件,在其中编写sql语句:
1 2 3 4 5 6 7 8 9 <?xml version="1.0" encoding="UTF-8" ?> <!DOCTYPE mapper PUBLIC "-//mybatis.org//DTD Mapper 3.0//EN" "http://mybatis.org/dtd/mybatis-3-mapper.dtd" > <mapper namespace ="data.mapper.CityMapper" > <insert id ="insert" > insert into city(name,state,country) values(#{name},#{state},#{country}); </insert > </mapper >
在application.yaml配置文件中添加mybatis规则,引入sql映射文件:
1 2 3 4 5 6 7 8 9 10 spring: datasource: url: jdbc:mysql://localhost:3306/test?useUnicode=true&characterEncoding=utf-8&serverTimezone=Asia/Shanghai username: root password: root driver-class-name: com.mysql.cj.jdbc.Driver mybatis: mapper-locations: classpath:mybatis/mapper/*.xml
编写CityService类:
1 2 3 4 5 6 7 8 9 10 11 12 13 14 15 16 17 18 19 import data.bean.City;import data.mapper.CityMapper;import org.springframework.beans.factory.annotation.Autowired;import org.springframework.stereotype.Service;@Service public class CityService @Autowired CityMapper cityMapper; public City getById (Integer id) return cityMapper.getById(id); } public void saveCity (City city) cityMapper.insert(city); } }
编写CityController类:
1 2 3 4 5 6 7 8 9 10 11 12 13 14 15 16 17 18 19 20 21 22 23 24 25 26 27 28 29 30 31 import data.bean.City;import data.service.CityService;import lombok.extern.slf4j.Slf4j;import org.springframework.beans.factory.annotation.Autowired;import org.springframework.stereotype.Controller;import org.springframework.web.bind.annotation.GetMapping;import org.springframework.web.bind.annotation.PostMapping;import org.springframework.web.bind.annotation.RequestParam;import org.springframework.web.bind.annotation.ResponseBody;@Slf4j @Controller public class CityController @Autowired CityService cityService; @ResponseBody @GetMapping("/city") public City getCityById (@RequestParam("id") Integer id) return cityService.getById(id); } @ResponseBody @PostMapping("/city") public City saveCity (City city) cityService.saveCity(city); return city; } }
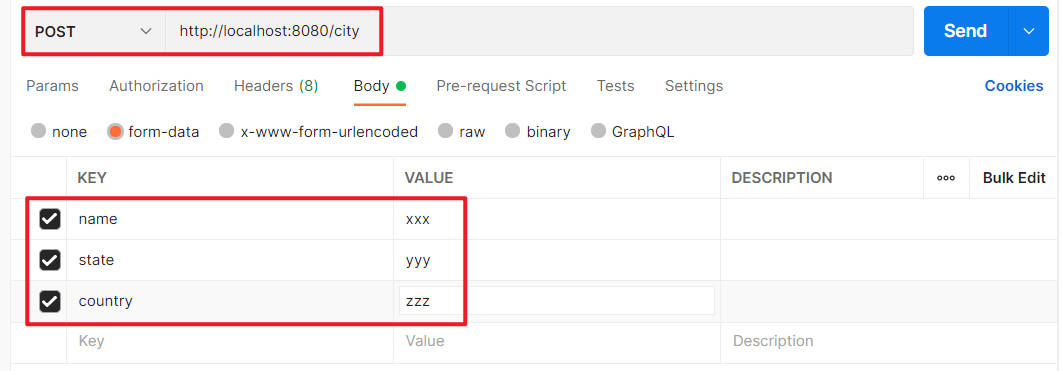
测试,启动服务。为了简化测试,使用postman发送请求:
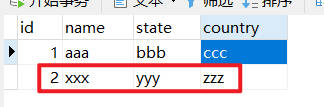
结果如下:
后记
推荐IDEA安装插件:MyBatisX