前言
本文将介绍利用query和param两种方式进行不同路由间的参数传递。
在写项目时遇到路由间参数传递的需求,查看之前学习记录相关的部分,总结的有些混乱。故有此篇,重新整理一下。
需求如下:
从登录界面(/login)跳转至主页(/home)要携带用户名信息
后端简单利用flask编写,登录发起的请求返回如下:

正文
param
路由的注册信息如下(index.js):
1
2
3
4
5
6
7
8
9
10
11
12
13
14
15
16
| const routes = [
{
path:'/',
redirect: 'login'
},
{
path: '/login',
name: 'Login',
component: Login
},
{
path: '/home',
name: 'Home',
component: Home
}
]
|
Login.vue的登录方法如下:
1
2
3
4
5
6
7
8
9
10
11
12
13
14
15
16
17
18
19
20
21
22
23
| login() {
this.$refs.loginFormRef.validate(async (valid) => {
if(!valid) {
return;
}
else {
const {data: res} = await this.$http.get('login', {params: this.loginForm});
if(res.statusCode !== 200) {
this.$message.error(res.msg);
}
else {
this.$message.success(res.msg);
window.sessionStorage.setItem('token', res.token);
this.$router.push({
name: 'Home',
params:{username:res.username}
}).catch(() => {});
}
}
})
}
|
Home.vue的接收:
1
2
3
4
5
6
| <template>
<div>
<h1>欢迎:{{this.$route.params.username}}</h1>
<el-button type="info" @click="logout">退出登录</el-button>
</div>
</template>
|
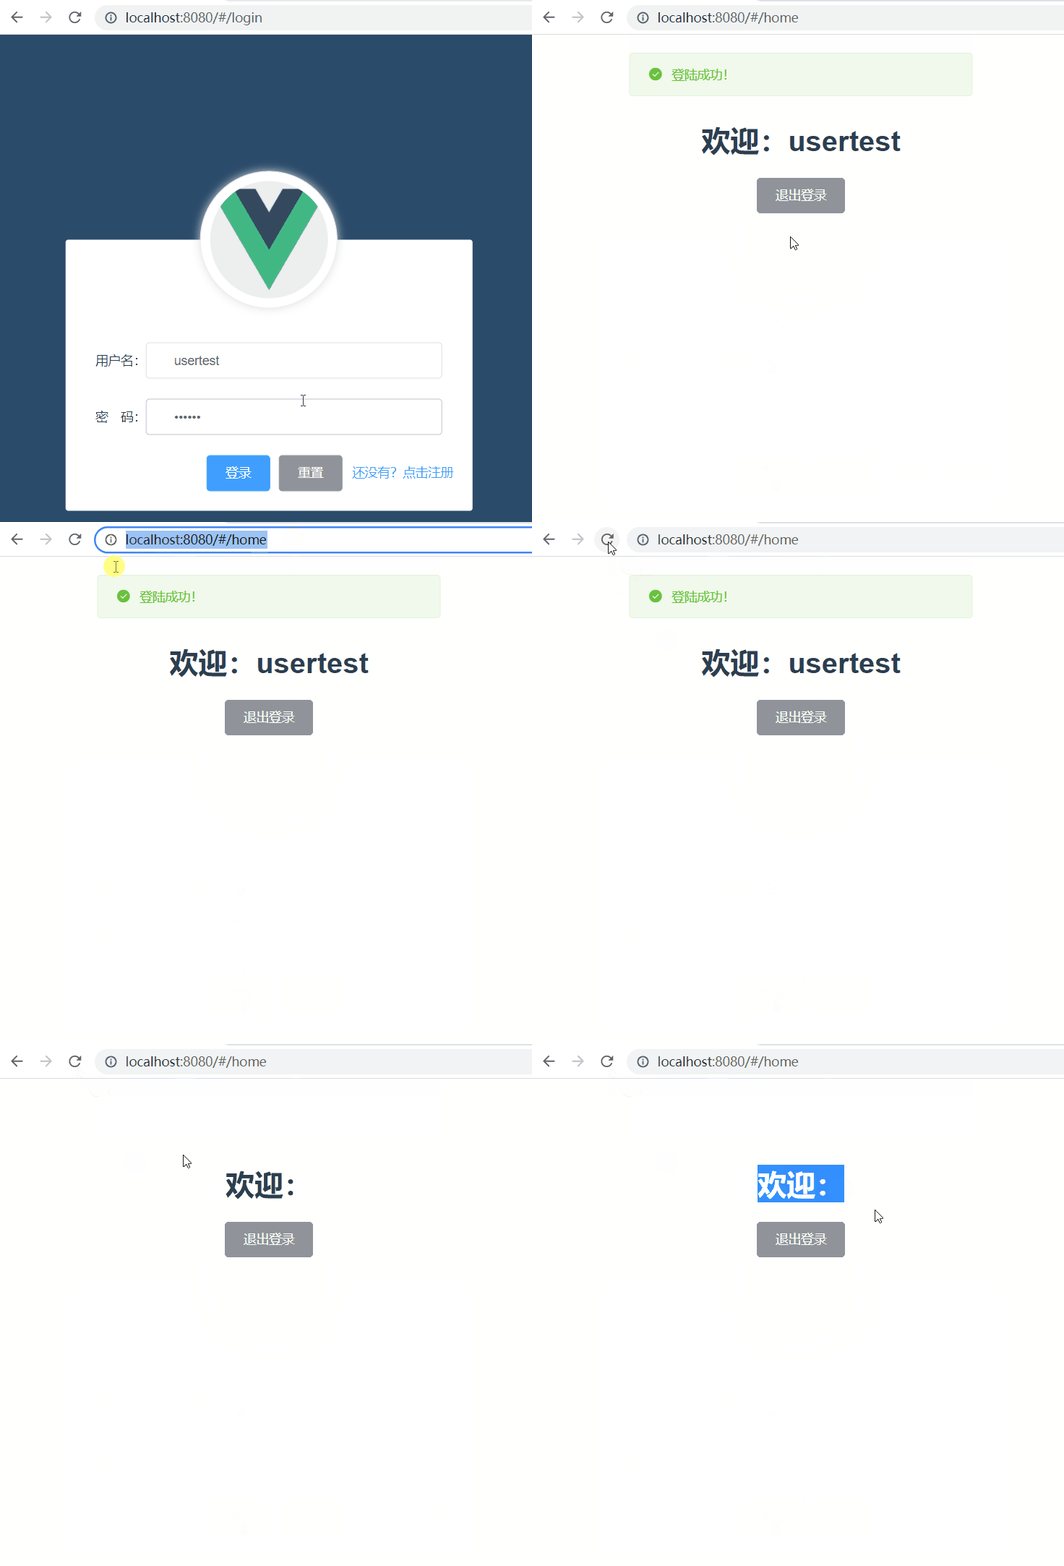
效果如下:

小结:
-
路由配置信息:
1
| {path: '/home', name: 'Home', component: Home}
|
-
路由跳转格式:
1
| this.$router.push({name: 'Home', params:{username:res.username}})
|
-
参数接收格式:
1
| this.$route.params.username
|
-
特点:
- 相当于
post请求,传递的参数不会在url中显示,具有一定程度的保密性
- 刷新页面后会丢失
params传递的数据
query
路由的注册信息如下(index.js):
1
2
3
4
5
6
7
8
9
10
11
12
13
14
15
16
| const routes = [
{
path:'/',
redirect: 'login'
},
{
path: '/login',
name: 'Login',
component: Login
},
{
path: '/home',
name: 'Home',
component: Home
}
]
|
Login.vue的登录方法如下:
1
2
3
4
5
6
7
8
9
10
11
12
13
14
15
16
17
18
19
20
21
22
23
| login() {
this.$refs.loginFormRef.validate(async (valid) => {
if(!valid) {
return;
}
else {
const {data: res} = await this.$http.get('login', {params: this.loginForm});
if(res.statusCode !== 200) {
this.$message.error(res.msg);
}
else {
this.$message.success(res.msg);
window.sessionStorage.setItem('token', res.token)
this.$router.push({
path: '/home',
query:{username:res.username}
}).catch(() => {});
}
}
})
}
|
Home.vue的接收:
1
2
3
4
5
6
| <template>
<div>
<h1>欢迎:{{this.$route.query.username}}</h1>
<el-button type="info" @click="logout">退出登录</el-button>
</div>
</template>
|
效果如下:

小结:
-
路由配置信息:
1
| {path: '/home', name: 'Home', component: Home}
|
-
路由跳转格式:
1
| this.$router.push({path: '/home', query:{username:res.username}})
|
-
参数接收格式:
1
| this.$route.query.username
|
-
特点:
- 相当于
get请求,传递的参数会显示在url中
- 在url中更改信息,页面中的显示也会随之改变
- 刷新页面后不会造成传递的数据丢失
后记
各有优劣,按需使用。


