前言
本篇介绍Spring配置文件的基本内容。
为了后期方便各州测试,在/src下新建test测试目录,在其中新建java文件夹,里面写测试代码
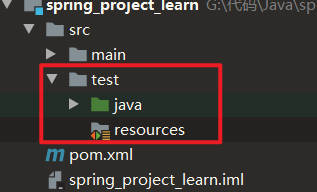
下文所提及的测试目录即为:/src/test/java
需要在pom.xml配置文件中添加junit依赖
1
2
3
4
5
| <dependency>
<groupId>junit</groupId>
<artifactId>junit</artifactId>
<version>4.11</version>
</dependency>
|
Spring配置文件
Bean标签
Bean标签用于配置对象,该对象交由Spring来创建
默认情况下,调用类中的无参构造方法(如果没有无参构造方法则会导致创建失败)
基本配置
<bean>标签的属性有:
- id:Bean实例在Spring容器中的唯一标识,用于获取对象。
- class:指定类的权限定类名。用于反射创建对象。默认情况下调用无参构造函数。
- scope:指对象的作用范围,包括:
- singleton:默认值,单例的(在Spring容器当中存在的对象只有一个)
- prototype:多例的(在Spring容器当中存在的对象有多个,每次调用
getBean()方法时都会新建对象)
- init-method:指定类中的初始化方法名称
- destory-method:指定类中销毁方法名称
scope范围属性
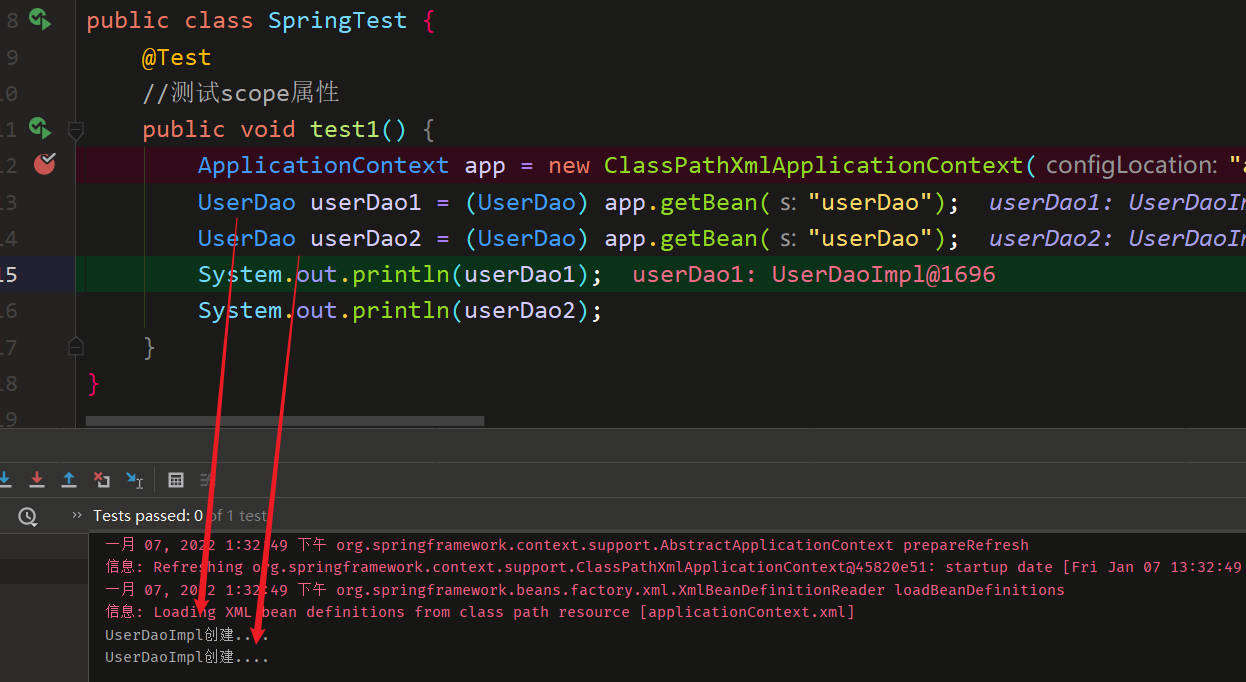
下面用具体的测试来比较singleton与prototype的区别:
-
Bean的实例化数量不同
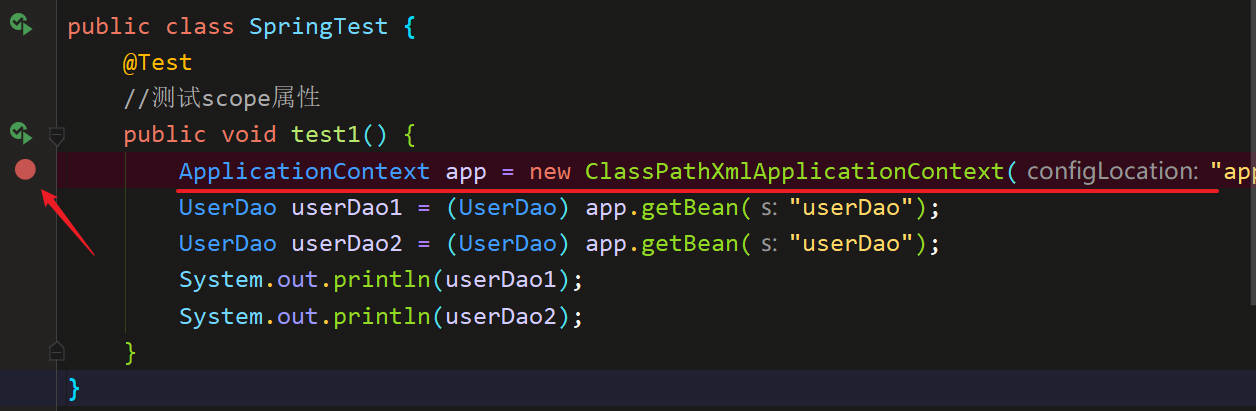
首先在测试目录中新建/test/SpringTest.java文件
1
2
3
4
5
6
7
8
9
10
11
12
13
14
15
16
| import dao.UserDao;
import org.junit.Test;
import org.springframework.context.ApplicationContext;
import org.springframework.context.support.ClassPathXmlApplicationContext;
public class SpringTest {
@Test
public void test1() {
ApplicationContext app = new ClassPathXmlApplicationContext("applicationContext.xml");
UserDao userDao1 = (UserDao) app.getBean("userDao");
UserDao userDao2 = (UserDao) app.getBean("userDao");
System.out.println(userDao1);
System.out.println(userDao2);
}
}
|
-
singleton:单例
将配置文件中<bean>标签中scope设置为singleton单例模式(不写默认为此):
1
2
3
4
5
6
7
8
9
| <?xml version="1.0" encoding="UTF-8"?>
<beans xmlns="http://www.springframework.org/schema/beans"
xmlns:xsi="http://www.w3.org/2001/XMLSchema-instance"
xmlns:p="http://www.springframework.org/schema/p"
xsi:schemaLocation="http://www.springframework.org/schema/beans http://www.springframework.org/schema/beans/spring-beans.xsd">
<bean id="userDao" class="dao.impl.UserDaoImpl" scope="singleton"></bean>
</beans>
|
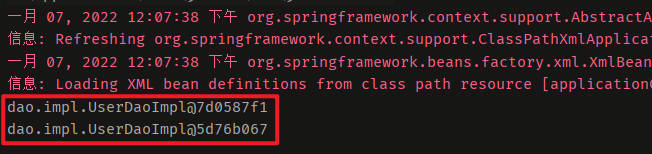
运行程序,这里创建两个对象,并打印两个对象的地址,结果一样:

-
prototype:多例
将配置文件中<bean>标签中scope设置为prototype多例模式:
1
| <bean id="userDao" class="dao.impl.UserDaoImpl" scope="prototype"></bean>
|
运行程序,同样打印两个对象的地址,结果不同:
-
Bean的实例化时机不同(生命周期)
首先在实现类UserDaoImpl中重写对象的无参构造方法,使其调用被调用时打印语句,方便观察:
1
2
3
4
5
6
7
8
9
10
11
12
13
| import dao.UserDao;
public class UserDaoImpl implements UserDao {
public UserDaoImpl() {
System.out.println("UserDaoImpl创建....");
}
@Override
public void save() {
System.out.println("save running....");
}
}
|
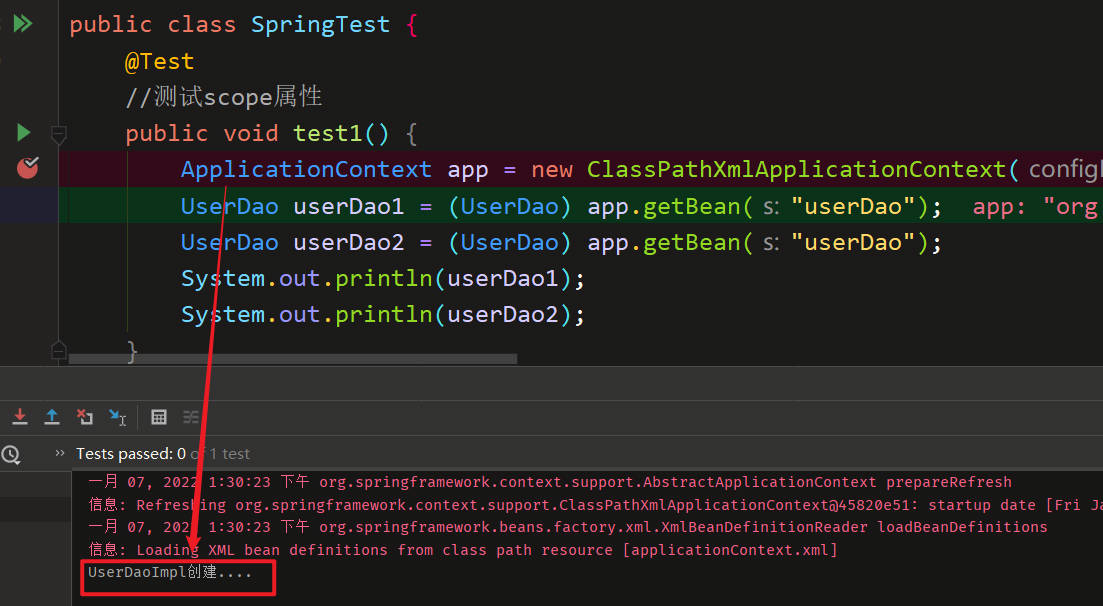
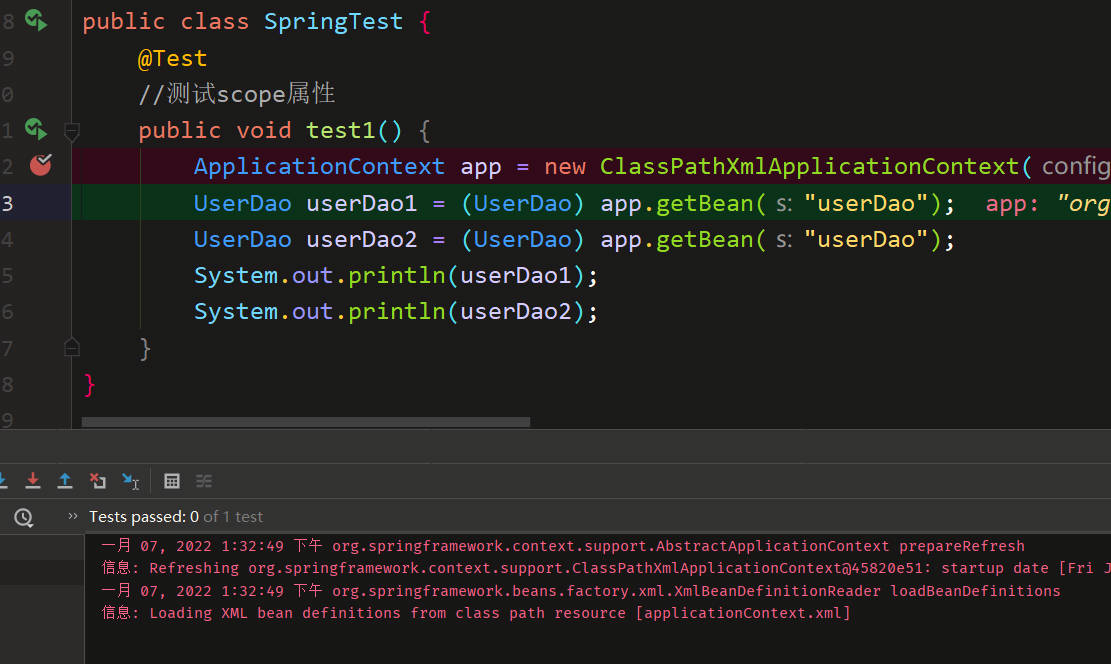
在测试类SpringTest中加载Spring核心文件(创建Spring容器)处打断点,进行debug调试:
小结:
- 当scope的取值为
singleton时
- Bean的实例化个数:1个
- Bean的实例化时机:当Spring核心文件被加载时,实例化配置的Bean实例
- Bean的生命周期:
- 对象创建:当应用加载,创建容器时,对象就被创建了
- 对象运行:只要容器在,对象一直活着
- 对象销毁:当应用卸载,销毁容器时,对象就被销毁了
- 当scope的取值为
prototype时
- Bean的实例化个数:多个
- Bean的实例化时机:当调用getBean()方法时实例化Bean
- Bean的生命周期:
- 对象创建:当使用对象时,创建新的对象实例
- 对象运行:只要对象在使用中,就一直活着
- 对象销毁:当对象长时间不用时,被 Java 的垃圾回收器回收了
Bean的生命周期
在实现类UserDaoImpl中编写init()初始化方法和destory()销毁方法:
1
2
3
4
5
6
7
8
9
10
11
12
13
14
15
16
17
18
19
20
21
| import dao.UserDao;
public class UserDaoImpl implements UserDao {
public UserDaoImpl() {
System.out.println("UserDaoImpl创建....");
}
public void init() {
System.out.println("初始化方法....");
}
public void destory() {
System.out.println("销毁方法....");
}
@Override
public void save() {
System.out.println("save running....");
}
}
|
init-method
用来指定类中的初始化方法名称
在配置文件的<bean>标签中添加init-method属性:
1
| <bean id="userDao" class="dao.impl.UserDaoImpl" init-method="init"></bean>
|
在测试时就可以看见对象创建时调用了编写的初始化方法。
destroy-method
用来指定类中销毁方法名称
在配置文件的<bean>标签中添加destroy-method属性:
1
| <bean id="userDao" class="dao.impl.UserDaoImpl" destroy-method="destory"></bean>
|
在测试时就可以看见对象销毁时调用了编写的销毁方法。
Bean实例化的方式
Bean有以下三种实例化方式:
- 无参构造方法实例化(默认)
- 工厂静态方法实例化
- 工厂实例方法实例化
下面主要演示工厂静态、实例方法实例化。
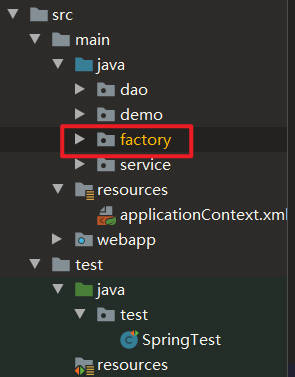
在/src/main/java目录下新建factory文件夹,用来编写实例化代码
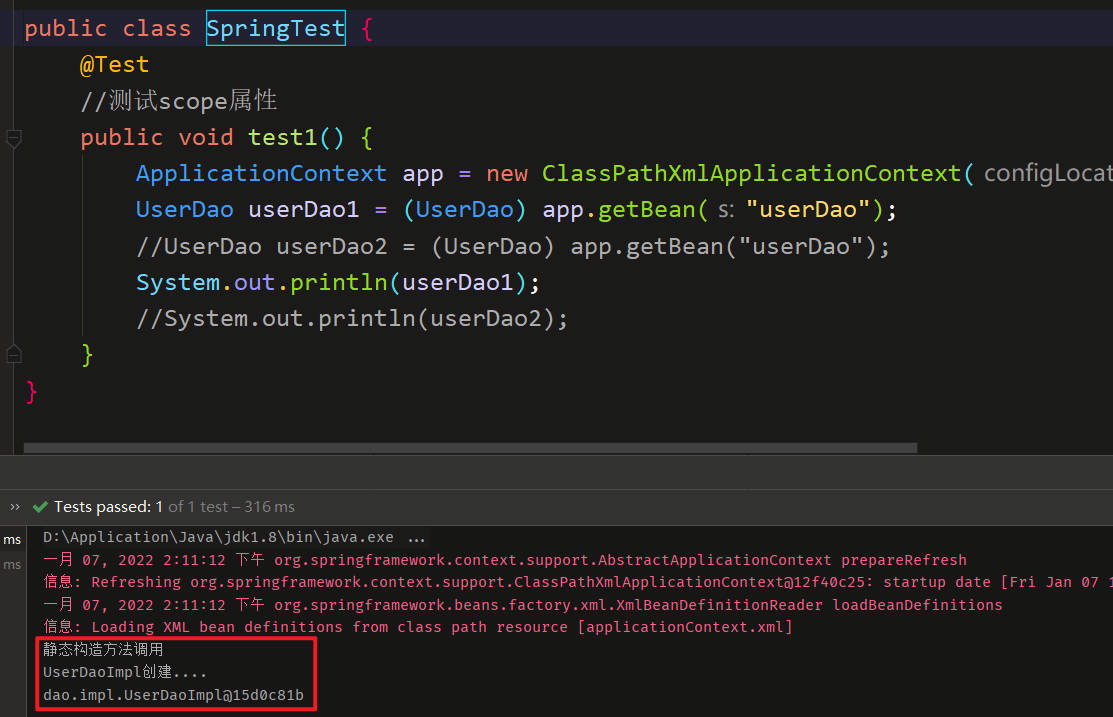
工厂静态方法实例化
在factory目录下新建StaticFactory类:
1
2
3
4
5
6
7
8
9
| import dao.UserDao;
import dao.impl.UserDaoImpl;
public class StaticFactory {
public static UserDao getUserDao() {
System.out.println("静态构造方法调用");
return new UserDaoImpl();
}
}
|
在配置文件中设置<bean>标签:
1
| <bean id="userDao" class="factory.StaticFactory" factory-method="getUserDao"></bean>
|
运行测试代码,对象被成功创建:
工厂实例方法实例化
在factory目录下新建DynamicFactory类:
1
2
3
4
5
6
7
8
9
| import dao.UserDao;
import dao.impl.UserDaoImpl;
public class DynamicFactory {
public UserDao getUserDao() {
System.out.println("实例方法调用");
return new UserDaoImpl();
}
}
|
在配置文件中设置<bean>标签:
1
2
| <bean id="factory" class="factory.DynamicFactory"></bean>
<bean id="userDao" factory-bean="factory" factory-method="getUserDao"></bean>
|
说明这里配置文件的执行步骤:
- 首先通过无参构造创建
DynamicFactory对象
- 再通过调用
DynamicFactory对象中的getUserDao方法去获得最终需要的UserDao对象
运行测试代码,对象被成功创建:

Bean的依赖注入
概念:依赖注入(Dependency Injection)是Spring框架核心IOC的具体实现。
正常业务层(Service)需要依赖Dao层,Spring可以统一管理维护这种依赖关系,降低耦合度。
正常情况业务层只需要获取业务层的对象就好,也可以直接调用Dao层的方法。(不需要自己再去获得Dao层的对象了)
依赖注入方式
依赖注入的方式有以下两种:
下面逐一介绍。
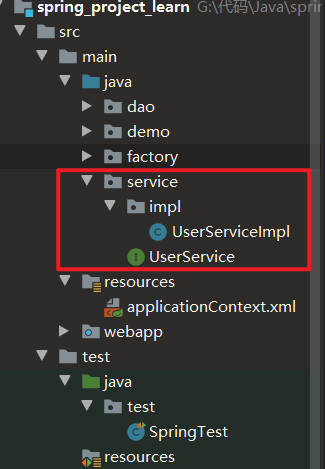
为了简化书写,这里在/src/main/java目录下新建service文件夹,作为业务层。
set()方法
在/src/main/java/service下新建接口UserService:
1
2
3
| public interface UserService {
public void save();
}
|
在同级目录下新建/impl/UserServiceImpl实现类:
1
2
3
4
5
6
7
8
9
10
11
12
13
14
15
16
17
| import dao.UserDao;
import org.springframework.context.ApplicationContext;
import org.springframework.context.support.ClassPathXmlApplicationContext;
import service.UserService;
public class UserServiceImpl implements UserService {
private UserDao userDao;
public void setUserDao(UserDao userDao) {
this.userDao = userDao;
}
@Override
public void save() {
userDao.save();
}
}
|
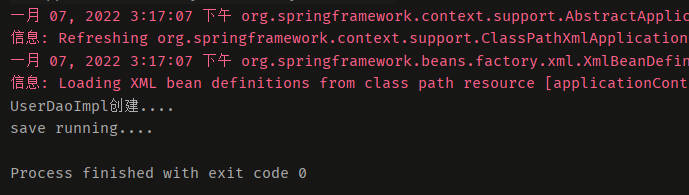
设置配置文件,将容器中的Dao对象注入给Service:
1
2
3
4
5
| <bean id="userDao" class="dao.impl.UserDaoImpl"></bean>
<bean id="userService" class="service.impl.UserServiceImpl">
<property name="userDao" ref="userDao"></property>
</bean>
|
说明:
- 构造Dao对象
- 构造Service对象
- 关于子标签
<property>:
name属性值为setXXX()方法中的“XXX”(首字母小写)ref属性值为Dao对象的id标识
验证:在/src/java/demo目录下新建测试类UserController:
1
2
3
4
5
6
7
8
9
10
11
| import org.springframework.context.ApplicationContext;
import org.springframework.context.support.ClassPathXmlApplicationContext;
import service.UserService;
public class UserController {
public static void main(String[] args) {
ApplicationContext app = new ClassPathXmlApplicationContext("applicationContext.xml");
UserService userService = (UserService) app.getBean("userService");
userService.save();
}
}
|
结果如下:
构造方法
在UserServiceImpl实现类中编写构造方法(实际是用到有参构造):
1
2
3
4
5
6
7
8
9
10
11
12
13
14
15
16
17
18
19
20
| import dao.UserDao;
import org.springframework.context.ApplicationContext;
import org.springframework.context.support.ClassPathXmlApplicationContext;
import service.UserService;
public class UserServiceImpl implements UserService {
private UserDao userDao;
public UserServiceImpl() {
}
public UserServiceImpl(UserDao userDao) {
this.userDao = userDao;
}
@Override
public void save() {
userDao.save();
}
}
|
设置配置文件,将容器中的Dao对象注入给Service:
1
2
3
4
5
| <bean id="userDao" class="dao.impl.UserDaoImpl"></bean>
<bean id="userService" class="service.impl.UserServiceImpl">
<constructor-arg name="userDao" ref="userDao"></constructor-arg>
</bean>
|
说明:
- 构造Dao对象
- 构造Service对象
- 关于子标签
<constructor-arg>:
name属性值为有参构造方法的形参传入ref属性值为Dao对象的id标识
结果如下:

依赖注入类型
依赖注入的数据类型包含以下三类:
前面的例字中展示的是引用Bean的注入,所以下面仅展示普通数据类型和集合数据类型的注入。
普通数据类型
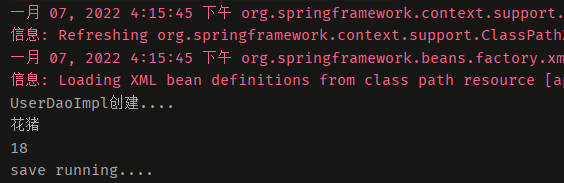
在UserDaoImpl实现类中定义username和age两个变量,并设置对应的set()方法,最后在save()方法中打印两个变量:
1
2
3
4
5
6
7
8
9
10
11
12
13
14
15
16
17
18
19
20
21
22
23
24
25
| import dao.UserDao;
public class UserDaoImpl implements UserDao {
private String username;
private int age;
public void setUsername(String username) {
this.username = username;
}
public void setAge(int age) {
this.age = age;
}
public UserDaoImpl() {
System.out.println("UserDaoImpl创建....");
}
@Override
public void save() {
System.out.println(username);
System.out.println(age);
System.out.println("save running....");
}
}
|
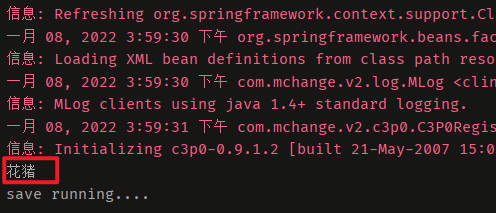
设置配置文件,注入普通类型数据:
1
2
3
4
| <bean id="userDao" class="dao.impl.UserDaoImpl">
<property name="username" value="花猪"></property>
<property name="age" value="18"></property>
</bean>
|
运行测试类UserDaoDemo:
1
2
3
4
5
6
7
8
9
10
11
| import dao.UserDao;
import org.springframework.context.ApplicationContext;
import org.springframework.context.support.ClassPathXmlApplicationContext;
public class UserDaoDemo {
public static void main(String[] args) {
ApplicationContext app = new ClassPathXmlApplicationContext("applicationContext.xml");
UserDao userDao = (UserDao) app.getBean("userDao");
userDao.save();
}
}
|
结果如下:
集合数据类型
这里演示注入字符串集合和对象集合
说明:
为了演示对象集合,在/src/main/java目录下新建domain文件夹,用于存放对象。
在domain目录下编写User:
1
2
3
4
5
6
7
8
9
10
11
12
13
14
15
16
17
18
19
20
21
22
23
24
25
26
27
28
| public class User {
private String name;
private int age;
public String getName() {
return name;
}
public void setName(String name) {
this.name = name;
}
public int getAge() {
return age;
}
public void setAge(int age) {
this.age = age;
}
@Override
public String toString() {
return "User{" +
"name='" + name + '\'' +
", age=" + age +
'}';
}
}
|
在UserDaoImpl实现类中定义strList和userMap两个集合,并设置对应的set()方法,最后在save()方法中打印两个集合:
1
2
3
4
5
6
7
8
9
10
11
12
13
14
15
16
17
18
19
20
21
22
23
24
25
26
27
28
| import dao.UserDao;
import domain.User;
import java.util.List;
import java.util.Map;
public class UserDaoImpl implements UserDao {
private List<String> strList;
private Map<String, User> userMap;
public void setStrList(List<String> strList) {
this.strList = strList;
}
public void setUserMap(Map<String, User> userMap) {
this.userMap = userMap;
}
public UserDaoImpl() {
System.out.println("UserDaoImpl创建....");
}
@Override
public void save() {
System.out.println(strList);
System.out.println(userMap);
System.out.println("save running....");
}
}
|
设置配置文件,注入集合类型数据:
1
2
3
4
5
6
7
8
9
10
11
12
13
14
15
16
17
18
19
20
21
22
23
24
| <bean id="user1" class="domain.User">
<property name="name" value="花猪"></property>
<property name="age" value="18"></property>
</bean>
<bean id="user2" class="domain.User">
<property name="name" value="张三"></property>
<property name="age" value="20"></property>
</bean>
<bean id="userDao" class="dao.impl.UserDaoImpl">
<property name="strList">
<list>
<value>aaa</value>
<value>bbb</value>
<value>ccc</value>
</list>
</property>
<property name="userMap">
<map>
<entry key="u1" value-ref="user1"></entry>
<entry key="u2" value-ref="user2"></entry>
</map>
</property>
</bean>
|
说明:
- 首先创建两个user对象
- 再构建Dao对象
<property>子标签用于设定两个集合- strList对应List集合,用
<list>子标签设定集合对象,用<value>子标签设定其中的值
- userMap对应Map集合,用
<map>子标签设定集合对象,用<entry>子标签设定其中的键值对(键(key)可以随意命名,值链接(value-ref)的值为user对象的id标识)
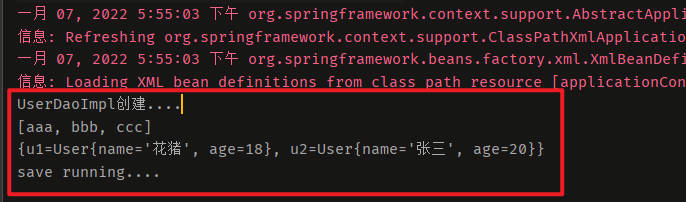
运行测试类UserDaoDemo:
1
2
3
4
5
6
7
8
9
10
11
| import dao.UserDao;
import org.springframework.context.ApplicationContext;
import org.springframework.context.support.ClassPathXmlApplicationContext;
public class UserDaoDemo {
public static void main(String[] args) {
ApplicationContext app = new ClassPathXmlApplicationContext("applicationContext.xml");
UserDao userDao = (UserDao) app.getBean("userDao");
userDao.save();
}
}
|
结果如下:
引入其他配置文件(模块开发)
在实际开发中,Spring配置文件会变得异常庞大且复杂,为了后期更好的维护,可以采用模块开发的思想,设定一个主配置文件,和其他模块的配置文件。
举例,现在项目中有:
主配置文件:
模块配置文件:
applicationContext-user.xmlapplicationContext-product.xml
那么可以在主配置文件中按照格式<import resource="applicationContext-xxx.xml"/>进行其他配置文件的引入:
1
2
| <import resource="applicationContext-user.xml"/>
<import resource="applicationContext-product.xml"/>
|
这样在加载主配置文件的时候,其中引入的其他配置文件也会被一同加载。
Spring相关API
ApplicationContext的实现类
在之前写测试代码的时候,实际上用到了多态的写法。
applicationContext是一个接口类型,代表应用上下文,可以通过其实例获得Spring容器中的 Bean 对象。
ApplicationContext的继承体系如下:
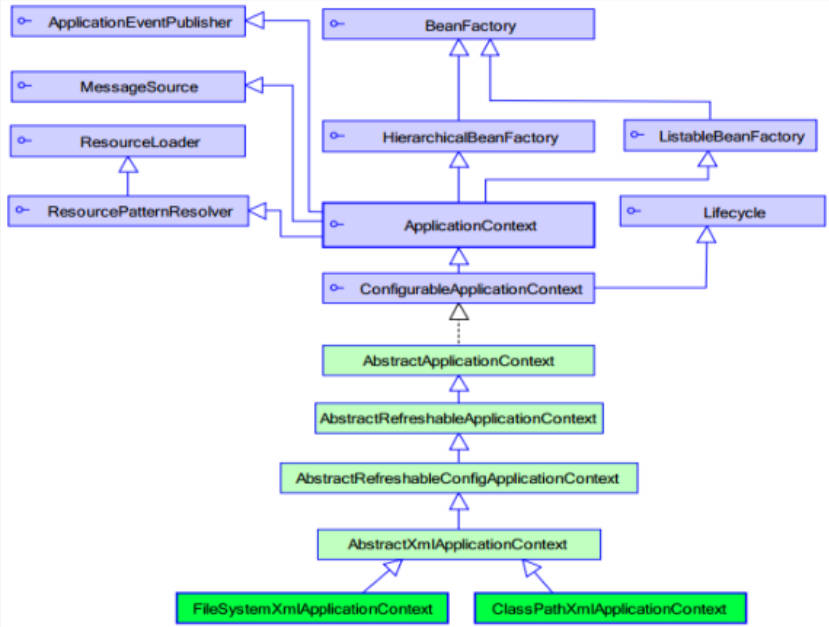
实现类有以下三种:
-
ClassPathXmlApplicationContext
从类的根路径下加载配置文件(参数需要写配置文件的相对路径)
-
FileSystemXmlApplicationContext
从磁盘路径上加载配置文件(参数需要写配置文件的绝对路径)
-
AnnotationConfigApplicationContext
当使用注解配置容器对象时,需要使用此类来创建spring容器。它用来读取注解。
getBean()方法
这里介绍两个常用的API,查看getBean()方法的源码
1
2
3
4
5
6
7
8
9
| public Object getBean(String name) throws BeansException {
assertBeanFactoryActive();
return getBeanFactory().getBean(name);
}
public <T> T getBean(Class<T> requiredType) throws BeansException {
assertBeanFactoryActive();
return getBeanFactory().getBean(requiredType);
}
|
第一个方法是传入一个id字符串(之前用的都是这种方式,这里不做过多介绍)
app.getBean("id")
第二个方法是传入一个字节码对象类型的字符串
app.getBean(Class)
编写测试类UserDaoDemo:
1
2
3
4
5
6
7
8
9
10
11
12
13
| import dao.UserDao;
import org.springframework.context.ApplicationContext;
import org.springframework.context.support.ClassPathXmlApplicationContext;
public class UserDaoDemo {
public static void main(String[] args) {
ApplicationContext app = new ClassPathXmlApplicationContext("applicationContext.xml");
UserDao userDao = app.getBean(UserDao.class);
userDao.save();
}
}
|
说明:
id方式允许配置文件中出现多个相同类型的bean;在实现时需要类型强转class方式不允许配置文件中出现多个相同类型的bean;在实现时不需要类型强转
按需使用
Spring配置数据源
常见的数据源(连接池):DBCP、C3P0、BoneCP、Druid等
数据源的开发步骤:
- 导入数据源的坐标和数据库驱动坐标
- 创建数据源对象
- 设置数据源的基本连接数据
- 使用数据源获取连接资源和归还连接资源
下面演示配置c3p0以及druid的数据源。
说明:
- MySQL版本:8.0.20
- 其中创建一个名为
test的数据库,用于以下代码测试练习
- 8.0以上版本的在配置数据库驱动时为:
com.mysql.cj.jdbc.Driver
首先新建一个Maven项目,配置pom.xml所需要的依赖:
1
2
3
4
5
6
7
8
9
10
11
12
13
14
15
16
17
18
19
20
21
22
23
24
25
26
27
28
| <dependencies>
<dependency>
<groupId>mysql</groupId>
<artifactId>mysql-connector-java</artifactId>
<version>8.0.21</version>
</dependency>
<dependency>
<groupId>c3p0</groupId>
<artifactId>c3p0</artifactId>
<version>0.9.1.2</version>
</dependency>
<dependency>
<groupId>com.alibaba</groupId>
<artifactId>druid</artifactId>
<version>1.1.10</version>
</dependency>
<dependency>
      <groupId>junit</groupId>
      <artifactId>junit</artifactId>
      <version>4.11</version>
</dependency>
<dependency>
<groupId>junit</groupId>
<artifactId>junit</artifactId>
<version>4.10</version>
<scope>test</scope>
</dependency>
</dependencies>
|
创建/src/test/java/test目录,在其中编写测试代码。
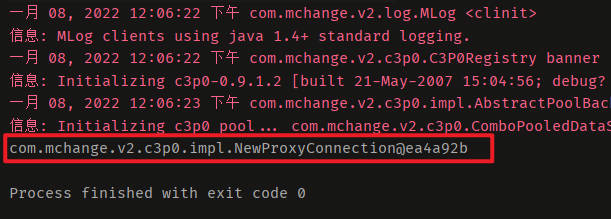
手动创建
c3p0
在/src/test/java/test目录下编写测试文件DataSourceTest:
1
2
3
4
5
6
7
8
9
10
11
12
13
14
15
16
17
18
19
| import com.mchange.v2.c3p0.ComboPooledDataSource;
import org.junit.Test;
import java.beans.PropertyVetoException;
import java.sql.Connection;
public class DataSourceTest {
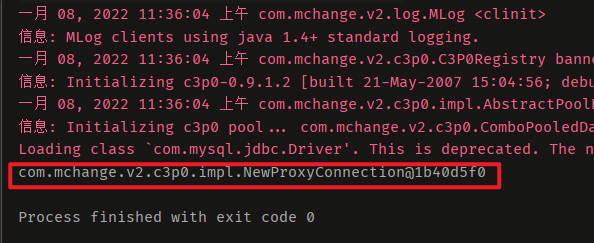
@Test
public void test1() throws Exception {
ComboPooledDataSource dataSource = new ComboPooledDataSource();
dataSource.setDriverClass("com.mysql.cj.jdbc.Driver");
dataSource.setJdbcUrl("jdbc:mysql://localhost:3306/test?useUnicode=true&characterEncoding=utf-8&serverTimezone=Asia/Shanghai");
dataSource.setUser("root");
dataSource.setPassword("root");
Connection connection = dataSource.getConnection();
System.out.println(connection);
connection.close();
}
}
|
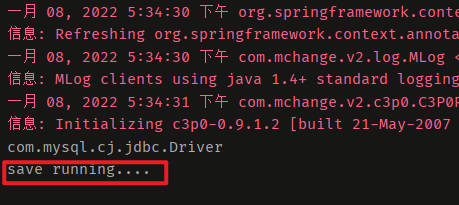
简要说明:
setDriverClass():设置数据库驱动setJdbcUrl():连接数据库的url。其中localhost表示本地主机;3306表示端口;test表示数据库名setUser():设置数据库用户名setPassword():设置数据库密码
运行结果,可以看连接数据库成功:
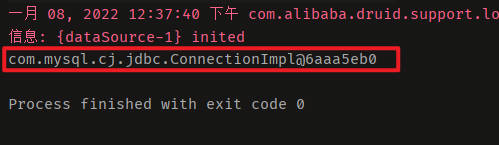
druid
在/src/test/java/test目录下编写测试文件DataSourceTest:
1
2
3
4
5
6
7
8
9
10
11
12
13
14
15
16
17
18
19
20
| import com.alibaba.druid.pool.DruidDataSource;
import com.alibaba.druid.pool.DruidPooledConnection;
import org.junit.Test;
import java.beans.PropertyVetoException;
import java.sql.Connection;
public class DataSourceTest {
@Test
public void test2() throws Exception {
DruidDataSource dataSource = new DruidDataSource();
dataSource.setDriverClassName("com.mysql.cj.jdbc.Driver");
dataSource.setUrl("jdbc:mysql://localhost:3306/test?useUnicode=true&characterEncoding=utf-8&serverTimezone=Asia/Shanghai");
dataSource.setUsername("root");
dataSource.setPassword("root");
DruidPooledConnection connection = dataSource.getConnection();
System.out.println(connection);
connection.close();
}
}
|
运行结果,可以看连接数据库成功:

配置文件(properties)
可以看到以上的数据库参数设置和数据源码是写在一起的,这样后期修改很不方便,于是可以考虑将数据库的参数设置剥离出来,降低二者的耦合度。
下面以c3p0为例:
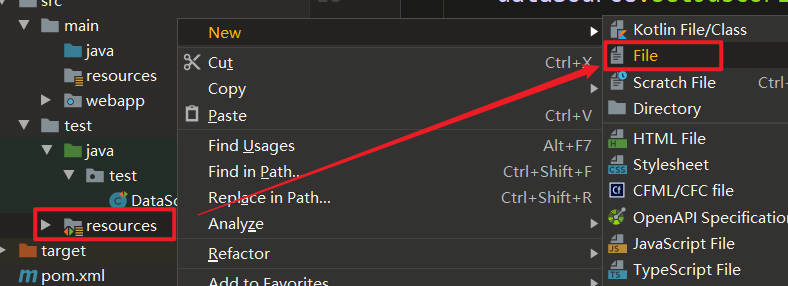
首先在/src/test/resources下新建一个名为jdbc.properties的配置文件:
接下来配置数据库驱动、连接url、用户名以及密码:
1
2
3
4
| jdbc.driver=com.mysql.cj.jdbc.Driver
jdbc.url=jdbc:mysql://localhost:3306/test?useUnicode=true&characterEncoding=utf-8&serverTimezone=Asia/Shanghai
jdbc.username=root
jdbc.password=root
|
编写测试文件DataSourceTest:
1
2
3
4
5
6
7
8
9
10
11
12
13
14
15
16
17
18
19
20
21
22
23
24
25
26
27
28
29
| import com.mchange.v2.c3p0.ComboPooledDataSource;
import org.junit.Test;
import java.beans.PropertyVetoException;
import java.sql.Connection;
import java.util.ResourceBundle;
public class DataSourceTest {
@Test
public void test3() throws Exception {
ResourceBundle rb = ResourceBundle.getBundle("jdbc");
String driver = rb.getString("jdbc.driver");
String url = rb.getString("jdbc.url");
String username = rb.getString("jdbc.username");
String password = rb.getString("jdbc.password");
ComboPooledDataSource dataSource = new ComboPooledDataSource();
dataSource.setDriverClass(driver);
dataSource.setJdbcUrl(url);
dataSource.setUser(username);
dataSource.setPassword(password);
Connection connection = dataSource.getConnection();
System.out.println(connection);
connection.close();
}
}
|
简要说明:
ResourceBundle.getBundle():用于获取配置文件,其中参数为配置文件的基本名称(忽略扩展名),它可以直接获取类根目录下/resources的文件。
运行测试,可以看连接数据库成功:
Spring配置
可以将DataSource的创建权交由Spring容器去完成
- DataSource有无参构造方法,而Spring默认就是通过无参构造方法实例化对象的
- DataSource要想使用需要通过set方法设置数据库连接信息,而Spring可以通过set方法进行字符串注入
因此刚好符合Spring的管理模式。
手动配置信息
下面分别演示c3p0和druid
首先在/src/test/resources目录下新建applicationContext.xml的Spring配置文件。
c3p0
在配置文件中编写bean:
1
2
3
4
5
6
| <bean id="dataSource" class="com.mchange.v2.c3p0.ComboPooledDataSource">
<property name="driverClass" value="com.mysql.cj.jdbc.Driver"></property>
<property name="jdbcUrl" value="jdbc:mysql://localhost:3306/test?useUnicode=true&characterEncoding=utf-8&serverTimezone=Asia/Shanghai"></property>
<property name="user" value="root"></property>
<property name="password" value="root"></property>
</bean>
|
注意在spring的xml配置文件中特殊字符的转义:
| 特殊符号 |
转义序列 |
| < |
< |
| > |
> |
| & |
& |
| " |
" |
| ’ |
' |
编写测试文件DataSourceTest:
1
2
3
4
5
6
7
8
9
10
11
12
13
14
15
16
17
18
19
20
| import com.mchange.v2.c3p0.ComboPooledDataSource;
import org.junit.Test;
import org.springframework.context.ApplicationContext;
import org.springframework.context.support.ClassPathXmlApplicationContext;
import javax.sql.DataSource;
import java.beans.PropertyVetoException;
import java.sql.Connection;
import java.util.ResourceBundle;
public class DataSourceTest {
@Test
public void test4() throws Exception {
ApplicationContext app = new ClassPathXmlApplicationContext("applicationContext.xml");
DataSource dataSource = app.getBean(DataSource.class);
Connection connection = dataSource.getConnection();
System.out.println(connection);
connection.close();
}
}
|
这里采用class方式获取bean
运行测试,可以看连接数据库成功:
druid
在配置文件中编写bean:
1
2
3
4
5
6
| <bean id="dataSource" class="com.mchange.v2.c3p0.ComboPooledDataSource">
<property name="driverClassName" value="com.mysql.cj.jdbc.Driver"></property>
<property name="url" value="jdbc:mysql://localhost:3306/test?useUnicode=true&characterEncoding=utf-8&serverTimezone=Asia/Shanghai"></property>
<property name="username" value="root"></property>
<property name="password" value="root"></property>
</bean>
|
编写测试文件DataSourceTest:
1
2
3
4
5
6
7
8
9
10
11
12
13
14
15
16
17
18
19
20
21
| import com.alibaba.druid.pool.DruidDataSource;
import com.alibaba.druid.pool.DruidPooledConnection;
import org.junit.Test;
import org.springframework.context.ApplicationContext;
import org.springframework.context.support.ClassPathXmlApplicationContext;
import javax.sql.DataSource;
import java.beans.PropertyVetoException;
import java.sql.Connection;
import java.util.ResourceBundle;
public class DataSourceTest {
@Test
public void test5() throws Exception {
ApplicationContext app = new ClassPathXmlApplicationContext("applicationContext.xml");
DataSource dataSource = (DataSource) app.getBean("dataSource");
Connection connection = dataSource.getConnection();
System.out.println(connection);
connection.close();
}
}
|
这里采用id方式获取bean
运行测试,可以看连接数据库成功:
加载配置文件
上一步配置的spring配置文件,其中bean的注入值都是写死的,尽管已经将数据配置和数据源代码分离开来,在后期维护还是比较复杂。为此可以让spring配置文件直接引入写好的properties配置文件,进一步解耦合。
下面以c3p0为例:
首先需要在applicationContext.xml中引入context的命名空间和约束路径:
- 命名空间:
xmlns:context="http://www.springframework.org/schema/context"
- 约束路径:
http://www.springframework.org/schema/context http://www.springframework.org/schema/context/spring-context.xsd
然后加载jdbc.properties配置文件:
完整配置如下:
1
2
3
4
5
6
7
8
9
10
11
12
13
14
15
16
17
18
19
| <?xml version="1.0" encoding="UTF-8"?>
<beans xmlns="http://www.springframework.org/schema/beans"
xmlns:xsi="http://www.w3.org/2001/XMLSchema-instance"
xmlns:context="http://www.springframework.org/schema/context"
xsi:schemaLocation=
"http://www.springframework.org/schema/beans http://www.springframework.org/schema/beans/spring-beans.xsd
http://www.springframework.org/schema/context http://www.springframework.org/schema/context/spring-context.xsd">
<context:property-placeholder location="classpath:jdbc.properties"></context:property-placeholder>
<bean id="dataSource" class="com.mchange.v2.c3p0.ComboPooledDataSource">
<property name="driverClass" value="${jdbc.driver}"></property>
<property name="jdbcUrl" value="${jdbc.url}"></property>
<property name="user" value="${jdbc.username}"></property>
<property name="password" value="${jdbc.password}"></property>
</bean>
</beans>
|
编写测试文件DataSourceTest:
1
2
3
4
5
6
7
8
9
10
11
12
13
14
15
16
17
18
19
20
21
| import com.alibaba.druid.pool.DruidDataSource;
import com.alibaba.druid.pool.DruidPooledConnection;
import org.junit.Test;
import org.springframework.context.ApplicationContext;
import org.springframework.context.support.ClassPathXmlApplicationContext;
import javax.sql.DataSource;
import java.beans.PropertyVetoException;
import java.sql.Connection;
import java.util.ResourceBundle;
public class DataSourceTest {
@Test
public void test5() throws Exception {
ApplicationContext app = new ClassPathXmlApplicationContext("applicationContext.xml");
DataSource dataSource = (DataSource) app.getBean("dataSource");
Connection connection = dataSource.getConnection();
System.out.println(connection);
connection.close();
}
}
|
运行测试,可以看连接数据库成功:

Spring注解开发
很多人调侃之前是“面向配置文件编程”,过于繁琐。
注解的出现,代替xml配置文件可以简化配置,提高开发效率。
原始注解
Spring原始注解主要是替代<Bean>的配置
| 注解 |
说明 |
| @Component |
使用在类上用于实例化Bean |
| @Controller |
使用在web层类上用于实例化Bean |
| @Service |
使用在service层类上用于实例化Bean |
| @Repository |
使用在dao层类上用于实例化Bean |
| @Autowired |
使用在字段上用于根据类型依赖注入 |
| @Qualifier |
结合@Autowired一起使用用于根据名称进行依赖注入 |
| @Resource |
结合@Autowired一起使用用于根据名称进行依赖注入 |
| @Value |
注入普通属性 |
| @Scope |
标注Bean的作用范围 |
| @PostConstruct |
标注Bean的作用范围 |
| @PreDestroy |
标注Bean的作用范围 |
首先在/src/test/java目录下新建annotation文件夹,在其中构建web项目结构:
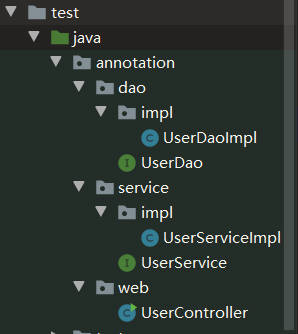
编写Dao层的接口UserDao:
1
2
3
| public interface UserDao {
public void save();
}
|
编写Dao层的接口实现类UserDaoImpl:
1
2
3
4
5
6
7
8
9
10
11
| import annotation.dao.UserDao;
import org.springframework.stereotype.Component;
@Repository("userDao")
public class UserDaoImpl implements UserDao {
public void save() {
System.out.println("save running....");
}
}
|
说明:
- 在类前添加注解
@Component,其值就是原配置文件中<bean>标签的id值
- 也可以使用
@Repository,专门设计用于Dao层实例化Bean。用法同@Component
编写service层的接口UserService:
1
2
3
| public interface UserService {
public void save();
}
|
编写service层的接口实现类UserServiceImpl:
1
2
3
4
5
6
7
8
9
10
11
12
13
14
15
16
17
18
19
20
21
22
23
| import annotation.service.UserService;
import annotation.dao.UserDao;
import org.springframework.beans.factory.annotation.Autowired;
import org.springframework.beans.factory.annotation.Qualifier;
import org.springframework.stereotype.Component;
@Service("userService")
public class UserServiceImpl implements UserService {
@Autowired
@Qualifier("userDao")
private UserDao userDao;
public void save() {
userDao.save();
}
}
|
说明:
- 使用注解的方式可以省略
set()方法
@Component注解用于实例化Bean对象UserServiceImpl@Service专门设计用于Service层实例化Bean。用法同@Component@Autowired注解按照数据类型从Spring容器中进行匹配(可单独使用)@Qualifier需要结合@Autowired使用,按照id值从容器中进行匹配。其参数为原<property>标签中的ref链接属性值。这里注入对象userDao@Resource需要结合@Autowired使用。参数为"name=id"
注解添加后,需要在applicationContext.xml配置文件中设置注解扫描,以便于加载该配置文件的时候可以找到对应的注解:
1
2
3
4
5
6
7
8
9
10
11
12
| <?xml version="1.0" encoding="UTF-8"?>
<beans xmlns="http://www.springframework.org/schema/beans"
xmlns:xsi="http://www.w3.org/2001/XMLSchema-instance"
xmlns:context="http://www.springframework.org/schema/context"
xsi:schemaLocation=
"http://www.springframework.org/schema/beans http://www.springframework.org/schema/beans/spring-beans.xsd
http://www.springframework.org/schema/context http://www.springframework.org/schema/context/spring-context.xsd">
<context:component-scan base-package="annotation"></context:component-scan>
</beans>
|
说明:
- 这里要用到context的命名空间
base-package的值表示扫描的目录,这里设定为annotation,表示在加载该配置文件时,会扫描annotation及其子目录的所有注解
如此一来,可以不用在编写繁杂的xml配置文件了。
在web层(为了方便做一个虚构)编写UserController使用类:
1
2
3
4
5
6
7
8
9
10
11
| import org.springframework.context.ApplicationContext;
import org.springframework.context.support.ClassPathXmlApplicationContext;
import annotation.service.UserService;
public class UserController {
public static void main(String[] args) {
ApplicationContext app = new ClassPathXmlApplicationContext("applicationContext.xml");
UserService userService = app.getBean(UserService.class);
userService.save();
}
}
|
运行结果如下:

如果需要注入普通值,就需要@Value注解
在service层的接口实现类UserServiceImpl中定义一个变量driver,用@Value进行注入,并在save()方法中打印该变量:
1
2
3
4
5
6
7
8
9
10
11
12
13
14
15
16
17
18
19
20
21
22
| import annotation.service.UserService;
import annotation.dao.UserDao;
import org.springframework.beans.factory.annotation.Autowired;
import org.springframework.beans.factory.annotation.Qualifier;
import org.springframework.beans.factory.annotation.Value;
import org.springframework.stereotype.Component;
import org.springframework.stereotype.Service;
import javax.annotation.Resource;
@Service("userService")
public class UserServiceImpl implements UserService {
@Value("花猪")
private String driver;
@Autowired
@Resource(name="userDao")
private UserDao userDao;
public void save() {
System.out.println(driver);
userDao.save();
}
}
|
运行UserController使用类,结果如下:
这样写看起来多此一举,该语句就等同于:private String driver = "花猪";
但是可以在其中使用SpEL表达式${},用于读取Spring容器中的变量。例如读取之前加载的jdbc的配置变量的值:
1
2
| @Value("${jdbc.driver}")
private String driver;
|
运行结果如下:

@Scope也可以添加到类前,用于规定单例(singleton)或多例(prototype)
1
2
3
4
5
| @Service("userService")
@Scope("prototype")
public class UserServiceImpl implements UserService {
}
|
新注解
举例:如果想要配置数据源这样非自定义Bean的注解,通过原始注解是无法替代的,类似不能配置注解的情况还有:
- 非自定义的Bean的配置:
<bean>
- 加载properties文件的配置:
<context:property-placeholder>
- 组件扫描的配置:
<context:component-scan>
- 引入其他文件:
<import>
这时就需要新的注解去发挥作用:
| 注解 |
说明 |
| @Configuration |
用于指定当前类是一个Spring配置类,当创建容器时会从该类上加载注解 |
| @ComponentScan |
用于指定Spring在初始化容器时要扫描的包。 |
| @Bean |
使用在方法上,标注将该方法的返回值存储到Spring容器中 |
| @PropertySource |
用于加载.properties文件中的配置 |
| @Import |
用于导入其他配置类 |
如果能将上述所有的情况都进行注解配置,那么就完全可以代替applicationContext.xml配置文件,彻底面向注解编程。
下面以配置数据源为例:
在/src/test/java/annotation目录下新建一个config文件夹,用于存放配置类文件
首先编写核心配置类SpringConfiguration:
1
2
3
4
5
6
7
8
9
10
11
12
13
14
15
16
| import com.mchange.v2.c3p0.ComboPooledDataSource;
import org.springframework.beans.factory.annotation.Value;
import org.springframework.context.annotation.*;
import javax.sql.DataSource;
import java.beans.PropertyVetoException;
@Configuration
@ComponentScan("annotation")
@Import({DataSourceConfiguration.class})
public class SpringConfiguration {
}
|
说明:
- 为了方便后期维护,需要设置一个核心配置类,它可以引入许多其他模块的配置类
@Configuration:标志该类是Spring的核心配置类@ComponentScan:用于指定Spring初始化时要扫描的包。替代了<context:component-scan>标签的功能。这里的参数annotation表示初始化时扫描annotation及其子目录下的所有注解@Import:用于导入其他配置类。其参数为一个集合{},可导入多个配置类,用,分隔
编写数据源配置类DataSourceConfiguration:
1
2
3
4
5
6
7
8
9
10
11
12
13
14
15
16
17
18
19
20
21
22
23
24
25
26
27
| import com.mchange.v2.c3p0.ComboPooledDataSource;
import org.springframework.beans.factory.annotation.Value;
import org.springframework.context.annotation.Bean;
import org.springframework.context.annotation.PropertySource;
import javax.sql.DataSource;
@PropertySource("classpath:jdbc.properties")
public class DataSourceConfiguration {
@Value("${jdbc.driver}")
private String driver;
@Value("${jdbc.url}")
private String url;
@Value("${jdbc.username}")
private String username;
@Value("${jdbc.password}")
private String password;
@Bean("dataSource")
public DataSource getDataSource() throws Exception {
ComboPooledDataSource dataSource = new ComboPooledDataSource();
dataSource.setDriverClass(driver);
dataSource.setJdbcUrl(url);
dataSource.setUser(username);
dataSource.setPassword(password);
return dataSource;
}
}
|
说明:
@PropertySource:用于加载.properties文件中的配置。这里导入了jdbc的配置文件@Bean:Spring会将当前方法的返回值以指定名称存储到Spring容器中
编写使用类UserController:
1
2
3
4
5
6
7
8
9
10
11
12
13
| import annotation.config.SpringConfiguration;
import org.springframework.context.ApplicationContext;
import org.springframework.context.annotation.AnnotationConfigApplicationContext;
import annotation.service.UserService;
public class UserController {
public static void main(String[] args) {
ApplicationContext app = new AnnotationConfigApplicationContext(SpringConfiguration.class);
UserService userService = app.getBean(UserService.class);
userService.save();
}
}
|
运行结果如下,可以看到成功调用save()方法
如此一来便可以完全摒弃配置文件,用配置类进行替代。
Spring整合Junit
之前进行Junit测试的步骤过于繁琐。SpringJunit可以提供更为简便的测试方法,他可以负责创建Spring容器。
Spring集成Junit步骤:
- 导入spring集成Junit的坐标
- 使用
@Runwith注解替换原来的运行期
- 使用
@ContextConfiguration指定配置文件或配置类
- 使用
@Autowired注入需要测试的对象
- 创建测试方法进行测试
下面进行演示:
首先在pom.xml文件中添加spring-test依赖
1
2
3
4
5
| <dependency>
<groupId>org.springframework</groupId>
<artifactId>spring-test</artifactId>
<version>5.0.5.RELEASE</version>
</dependency>
|
如果后期运行报错,可以将junit依赖更换为4.12版本以上。
1
2
3
4
5
6
| <dependency>
<groupId>junit</groupId>
<artifactId>junit</artifactId>
<version>4.12</version>
<scope>test</scope>
</dependency>
|
配置文件
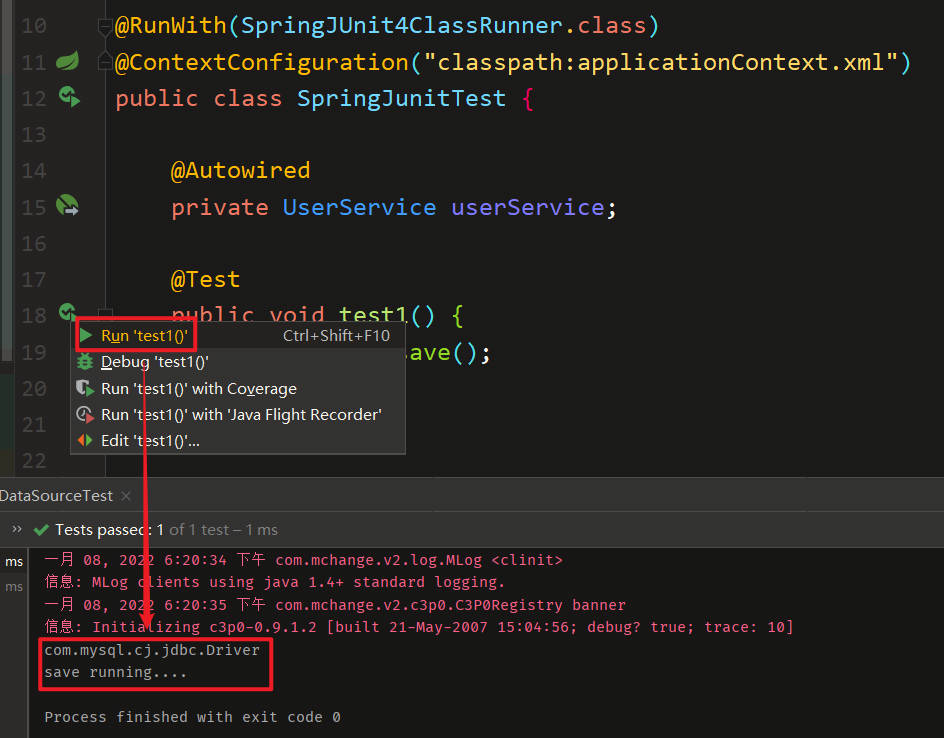
在/src/test/java/test目录下编写测试类SpringJunitTest:
1
2
3
4
5
6
7
8
9
10
11
12
13
14
15
16
17
18
19
| import annotation.service.UserService;
import org.junit.Test;
import org.junit.runner.RunWith;
import org.springframework.beans.factory.annotation.Autowired;
import org.springframework.test.context.ContextConfiguration;
import org.springframework.test.context.junit4.SpringJUnit4ClassRunner;
@RunWith(SpringJUnit4ClassRunner.class)
@ContextConfiguration("classpath:applicationContext.xml")
public class SpringJunitTest {
@Autowired
private UserService userService;
@Test
public void test1() {
userService.save();
}
}
|
说明:
@RunWith(SpringJUnit4ClassRunner.class):利用Spring提供的一个内核去跑测试@ContextConfiguration(value = "测试文件"):指定配置文件
直接点击测试方法旁边的运行按钮,即可测试:
配置类
在/src/test/java/test目录下编写测试类SpringJunitTest:
1
2
3
4
5
6
7
8
9
10
11
12
13
14
15
16
17
18
19
20
| import annotation.config.SpringConfiguration;
import annotation.service.UserService;
import org.junit.Test;
import org.junit.runner.RunWith;
import org.springframework.beans.factory.annotation.Autowired;
import org.springframework.test.context.ContextConfiguration;
import org.springframework.test.context.junit4.SpringJUnit4ClassRunner;
@RunWith(SpringJUnit4ClassRunner.class)
@ContextConfiguration(classes = {SpringConfiguration.class})
public class SpringJunitTest {
@Autowired
private UserService userService;
@Test
public void test1() {
userService.save();
}
}
|
说明:
@ContextConfiguration(classes = {配置类1,配置类2,...}):指定对应配置类的字节码文件(是一个集合,可指定多个)
Spring集成web环境
项目环境搭建
为了更好地讲解Spring集成web环境,这里先用maven搭建一个web项目,项目结构如下:
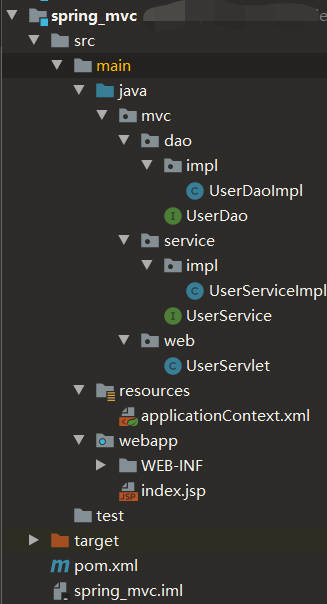
说明:
首先配置pom.xml的依赖:
1
2
3
4
5
6
7
8
9
10
11
12
13
14
15
16
17
18
19
20
21
22
23
24
25
26
27
28
29
30
31
32
33
34
35
36
37
38
39
40
41
42
43
44
45
46
47
48
| <dependencies>
<dependency>
<groupId>mysql</groupId>
<artifactId>mysql-connector-java</artifactId>
<version>8.0.21</version>
</dependency>
<dependency>
<groupId>c3p0</groupId>
<artifactId>c3p0</artifactId>
<version>0.9.1.2</version>
</dependency>
<dependency>
<groupId>com.alibaba</groupId>
<artifactId>druid</artifactId>
<version>1.1.10</version>
</dependency>
<dependency>
<groupId>junit</groupId>
<artifactId>junit</artifactId>
<version>4.11</version>
</dependency>
<dependency>
<groupId>junit</groupId>
<artifactId>junit</artifactId>
<version>4.12</version>
<scope>test</scope>
</dependency>
<dependency>
<groupId>org.springframework</groupId>
<artifactId>spring-context</artifactId>
<version>5.0.5.RELEASE</version>
</dependency>
<dependency>
<groupId>org.springframework</groupId>
<artifactId>spring-test</artifactId>
<version>5.0.5.RELEASE</version>
</dependency>
<dependency>
<groupId>javax.servlet</groupId>
<artifactId>javax.servlet-api</artifactId>
<version>3.0.1</version>
</dependency>
<dependency>
<groupId>javax.servlet.jsp</groupId>
<artifactId>javax.servlet.jsp-api</artifactId>
<version>2.2.1</version>
</dependency>
</dependencies>
|
建立目录结构/src/main/java/mvc,并在其中搭建dao、service、web层
-
dao层:
编写UserDao接口:
1
2
3
| public interface UserDao {
public void save();
}
|
编写UserDaoImpl实现类:
1
2
3
4
5
6
7
| import mvc.dao.UserDao;
public class UserDaoImpl implements UserDao {
public void save() {
System.out.println("save running....");
}
}
|
-
service层
编写UserService接口:
1
2
3
| public interface UserService {
public void save();
}
|
编写UserServiceImpl实现类:
1
2
3
4
5
6
7
8
9
10
11
12
13
14
| import mvc.dao.UserDao;
import mvc.service.UserService;
public class UserServiceImpl implements UserService {
private UserDao userDao;
public void setUserDao(UserDao userDao) {
this.userDao = userDao;
}
public void save() {
userDao.save();
}
}
|
-
web层
编写UserServlet类:
1
2
3
4
5
6
7
8
9
10
11
12
13
14
15
16
17
18
| import mvc.service.UserService;
import org.springframework.context.ApplicationContext;
import org.springframework.context.support.ClassPathXmlApplicationContext;
import javax.servlet.ServletException;
import javax.servlet.http.HttpServlet;
import javax.servlet.http.HttpServletRequest;
import javax.servlet.http.HttpServletResponse;
import java.io.IOException;
public class UserServlet extends HttpServlet {
@Override
protected void doGet(HttpServletRequest req, HttpServletResponse resp) throws ServletException, IOException {
ApplicationContext app = new ClassPathXmlApplicationContext("applicationContext.xml");
UserService userService = app.getBean(UserService.class);
userService.save();
}
}
|
-
配置applicationContext.xml配置文件:
1
2
3
4
5
6
7
8
9
10
11
12
13
14
| <?xml version="1.0" encoding="UTF-8"?>
<beans xmlns="http://www.springframework.org/schema/beans"
xmlns:xsi="http://www.w3.org/2001/XMLSchema-instance"
xsi:schemaLocation="http://www.springframework.org/schema/beans http://www.springframework.org/schema/beans/spring-beans.xsd">
<bean id="userDao" class="mvc.dao.impl.UserDaoImpl"></bean>
<bean id="userService" class="mvc.service.impl.UserServiceImpl">
<property name="userDao" ref="userDao"></property>
</bean>
</beans>
|
-
在/src/main/webapp/WEB-INF目录下编写web.xml:
1
2
3
4
5
6
7
8
9
10
11
12
13
14
15
16
| <?xml version="1.0" encoding="UTF-8"?>
<web-app version="2.4"
xmlns="http://java.sun.com/xml/ns/j2ee"
xmlns:xsi="http://www.w3.org/2001/XMLSchema-instance"
xsi:schemaLocation="http://java.sun.com/xml/ns/j2ee http://java.sun.com/xml/ns/j2ee/web-app_2_4.xsd">
<servlet>
<servlet-name>UserServlet</servlet-name>
<servlet-class>mvc.web.UserServlet</servlet-class>
</servlet>
<servlet-mapping>
<servlet-name>UserServlet</servlet-name>
<url-pattern>/userServlet</url-pattern>
</servlet-mapping>
</web-app>
|
-
配置tomcat
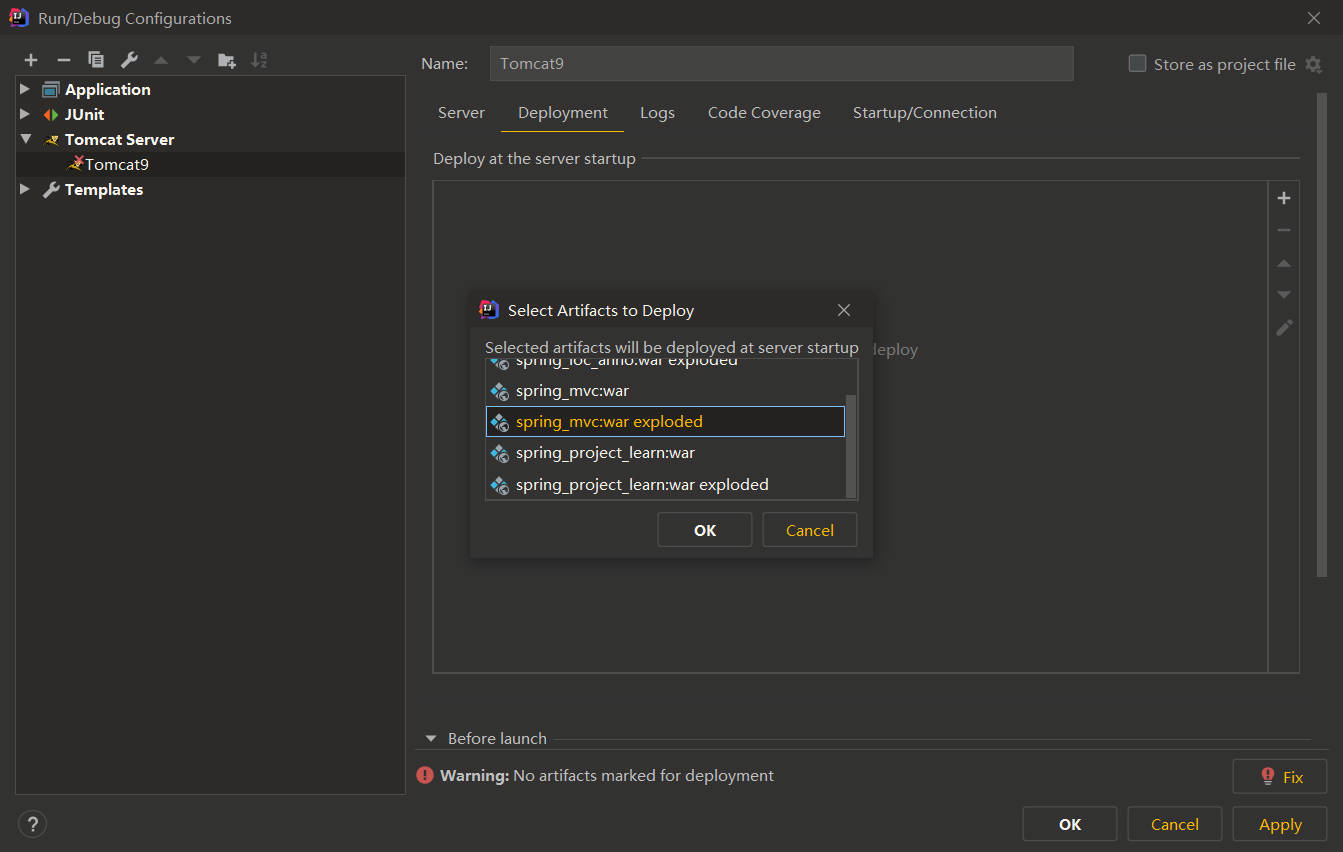
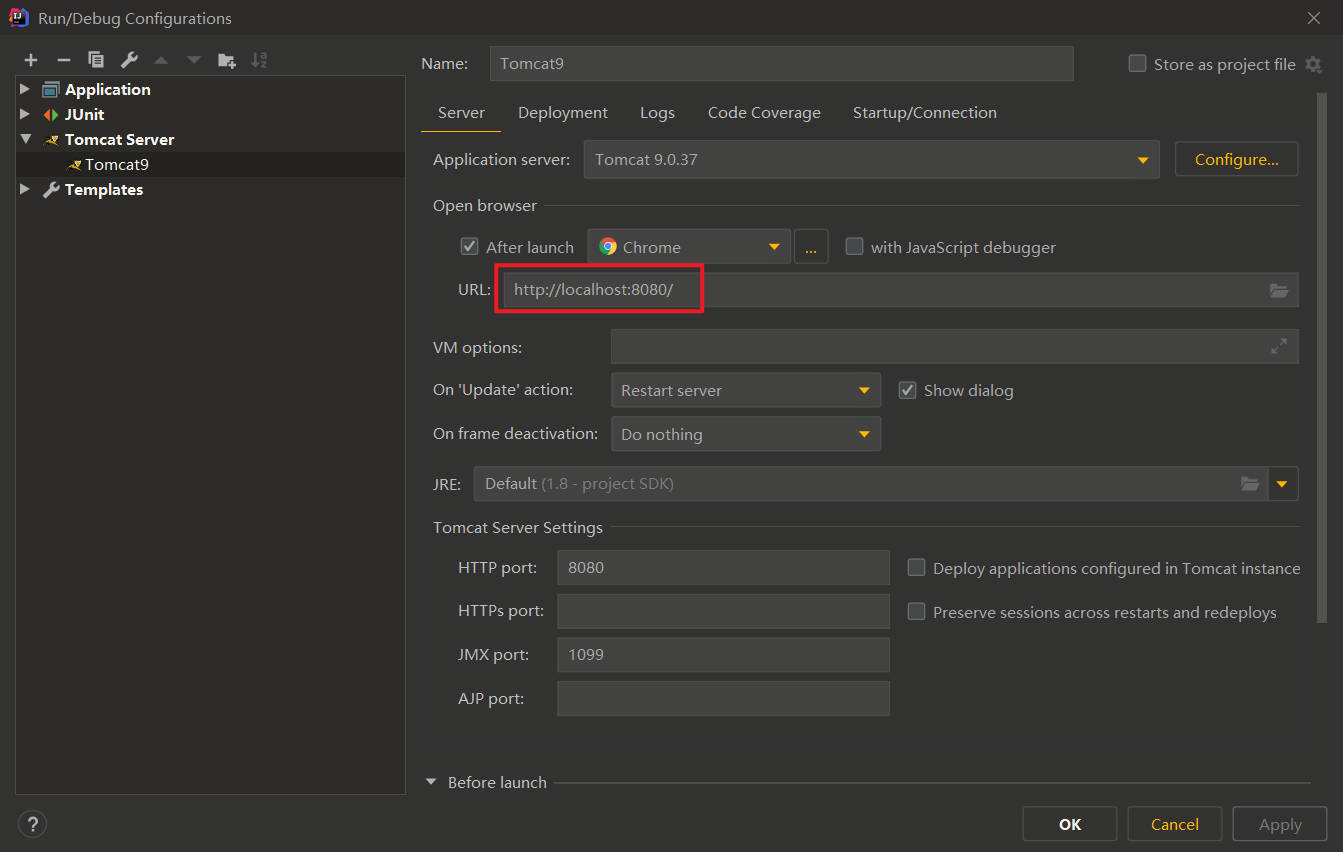
-
启动tomcat,访问http://localhost:8080/userServlet。可以看到在控制台有打印输出,环境初步搭建完毕:

web环境集成
上述环境搭建,应用上下文对象是通过new ClasspathXmlApplicationContext(spring配置文件)方式获取的,但是每次从容器中获得Bean时都要编写new ClasspathXmlApplicationContext(spring配置文件),这样的弊端是配置文件加载多次,应用上下文对象创建多次。
在Web项目中,可以使用ServletContextListener监听Web应用的启动,可以在Web应用启动时,就加载Spring的配置文件,创建应用上下文对象ApplicationContext,在将其存储到最大的域servletContext域中,这样就可以在任意位置从域中获得应用上下文ApplicationContext对象了。
首先在/src/main/java/mvc目录中创建listener文件夹,在其中编写ContextLoaderListener监听类:
1
2
3
4
5
6
7
8
9
10
11
12
13
14
15
16
17
18
19
20
| import org.springframework.context.ApplicationContext;
import org.springframework.context.support.ClassPathXmlApplicationContext;
import javax.servlet.ServletContext;
import javax.servlet.ServletContextEvent;
import javax.servlet.ServletContextListener;
public class ContextLoaderListener implements ServletContextListener {
public void contextInitialized(ServletContextEvent servletContextEvent) {
ApplicationContext app = new ClassPathXmlApplicationContext("applicationContext.xml");
ServletContext servletContext = servletContextEvent.getServletContext();
servletContext.setAttribute("app",app);
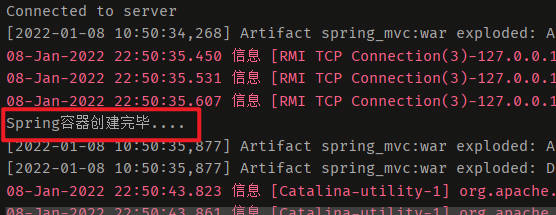
System.out.println("Spring容器创建完毕....");
}
public void contextDestroyed(ServletContextEvent servletContextEvent) {
}
}
|
说明:
- 在context初始化方法下先加载配置文件
- 将Spring的应用上下文对象app存储到
ServletContext域中
- 添加一个打印语句,在web服务启动时输出
在web.xml中配置监听器:
1
2
3
4
|
<listener>
<listener-class>mvc.listener.ContextLoaderListener</listener-class>
</listener>
|
如此一来,在UserServlet中就可以通过调用ServletContext域中的ApplicationContext对象使用,而无需加载配置文件:
1
2
3
4
5
6
7
8
9
10
11
12
13
14
15
16
17
18
19
20
| import mvc.service.UserService;
import org.springframework.context.ApplicationContext;
import javax.servlet.ServletContext;
import javax.servlet.ServletException;
import javax.servlet.http.HttpServlet;
import javax.servlet.http.HttpServletRequest;
import javax.servlet.http.HttpServletResponse;
import java.io.IOException;
public class UserServlet extends HttpServlet {
@Override
protected void doGet(HttpServletRequest req, HttpServletResponse resp) throws ServletException, IOException {
ServletContext servletContext = this.getServletContext();
ApplicationContext app = (ApplicationContext) servletContext.getAttribute("app");
UserService userService = app.getBean(UserService.class);
userService.save();
}
}
|
启动tomcat服务,可以看到,监听器监听到服务后调用context初始化方法:
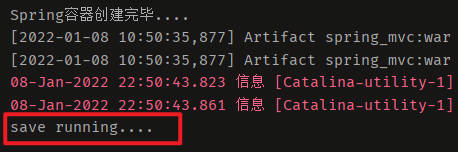
浏览器访问http://localhost:8080/userServlet,调用doGet方法,在控制台输出打印:
Spring集成web环境
以上对web环境进行了一个手动封装,但其实Spring提供了一个监听器ContextLoaderListener就是对上述功能的封装,该监听器内部加载Spring配置文件,创建应用上下文对象,并存储到ServletContext域中,提供了一个客户端工具WebApplicationContextUtils供使用者获得应用上下文对象。
有了这个工具后,我们只需要做两件事:
- 在web.xml中配置ContextLoaderListener监听器(导入spring-web坐标)
- 使用WebApplicationContextUtils获得应用上下文对象ApplicationContext
首先在pom.xml配置文件中添加spring-web依赖:
1
2
3
4
5
| <dependency>
<groupId>org.springframework</groupId>
<artifactId>spring-web</artifactId>
<version>5.0.5.RELEASE</version>
</dependency>
|
然后在web.xml配置文件中添加全局初始化参数(用于加载applicationContext.xml配置文件),以及配置监听器:
1
2
3
4
5
6
7
8
9
10
|
<context-param>
<param-name>contextConfigLocation</param-name>
<param-value>classpath:applicationContext.xml</param-value>
</context-param>
<listener>
<listener-class>org.springframework.web.context.ContextLoaderListener</listener-class>
</listener>
|
最后在UserServlet中使用:
1
2
3
4
5
6
7
8
9
10
11
12
13
14
15
16
17
18
19
20
| import mvc.service.UserService;
import org.springframework.context.ApplicationContext;
import org.springframework.web.context.support.WebApplicationContextUtils;
import javax.servlet.ServletContext;
import javax.servlet.ServletException;
import javax.servlet.http.HttpServlet;
import javax.servlet.http.HttpServletRequest;
import javax.servlet.http.HttpServletResponse;
import java.io.IOException;
public class UserServlet extends HttpServlet {
@Override
protected void doGet(HttpServletRequest req, HttpServletResponse resp) throws ServletException, IOException {
ServletContext servletContext = this.getServletContext();
ApplicationContext app = WebApplicationContextUtils.getWebApplicationContext(servletContext);
UserService userService = app.getBean(UserService.class);
userService.save();
}
}
|
说明:
- 通过
WebApplicationContextUtils.getWebApplicationContext(servletContext)直接获取ApplicationContext实例化对象
启动tomcat服务,访问http://localhost:8080/userServlet:
拦截器
拦截器(interceptor)的作用:
SpringMVC的拦截器类似于Servlet开发中的过滤器Filter,用于对处理器进行预处理和后处理。
将拦截器按一定的顺序联结成一条链,这条链称为拦截器链(Interceptor Chain)。在访问被拦截的方法或字段时,拦截器链中的拦截器就会按其之前定义的顺序被调用。拦截器也是AOP思想的具体实现。
拦截器与过滤器的区别
| 区别 |
过滤器(Filter) |
拦截器(Interceptor) |
| 使用范围 |
是servlet规范中的一部分,任何JavaWeb工程都可以使用 |
是SpringMVC框架自己的,只有使用了SpringMVC框架的工程才能用 |
| 拦截范围 |
在url-pattern中配置了/*之后,可以对所有要访问的资源拦截 |
在<mvc:mapping path=“”/>中配置了/**之后,也可以多所有资源进行拦截,但是可以通过<mvc:exclude-mapping path=“”/>标签排除不需要拦截的资源 |
自定义拦截器
首先配置环境:
在/src/main/java//mvc/controller目录下创建一个TargetController类:
1
2
3
4
5
6
7
8
9
10
11
12
13
14
15
| import org.springframework.stereotype.Controller;
import org.springframework.web.bind.annotation.RequestMapping;
import org.springframework.web.servlet.ModelAndView;
@Controller
public class TargetController {
@RequestMapping("/target")
public ModelAndView show() {
System.out.println("目标资源被执行....");
ModelAndView modelAndView = new ModelAndView();
modelAndView.addObject("name","HuaZhu");
modelAndView.setViewName("index");
return modelAndView;
}
}
|
在/src/main/webapp/jsp下新建一个index.jsp文件:
1
2
3
4
5
| <html>
<body>
<h2>Hello World!${name}</h2>
</body>
</html>
|
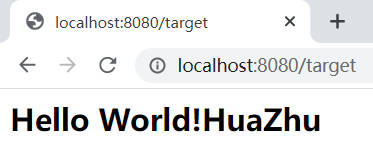
启动tomcat服务,访问http://localhost:8080/target,可以看到如下效果:
拦截器配置步骤如下:
- 创建拦截器类实现
HandlerInterceptor接口
- 配置拦截器
- 测试拦截器的拦截效果
在/src/main/java/mvc目录下新建interceptor文件夹,在其中新建MyInterceptor1类:
1
2
3
4
5
6
7
8
9
10
11
12
13
14
15
16
17
18
19
20
21
22
23
24
25
26
| import org.springframework.web.servlet.HandlerInterceptor;
import org.springframework.web.servlet.ModelAndView;
import javax.servlet.http.HttpServletRequest;
import javax.servlet.http.HttpServletResponse;
public class MyInterceptor1 implements HandlerInterceptor {
@Override
public boolean preHandle(HttpServletRequest request, HttpServletResponse response, Object handler) throws Exception {
System.out.println("perHandle....");
return true;
}
@Override
public void postHandle(HttpServletRequest request, HttpServletResponse response, Object handler, ModelAndView modelAndView) throws Exception {
System.out.println("postHandle....");
}
@Override
public void afterCompletion(HttpServletRequest request, HttpServletResponse response, Object handler, Exception ex) throws Exception {
System.out.println("afterCompletion....");
}
}
|
说明:
-
这里实现了HandlerInterceptor接口(其中全部都是空的default方法)
-
preHandle()方法是在目标方法执行之前【执行】
返回true代表放行,false代表不放行。
-
postHandle()方法是在目标方法执行之后,视图对象返回之前 【执行】
-
afterCompletion()方法是在所有流程执行完毕之后 【执行】
在spring-mvc.xml配置文件中配置拦截器:
1
2
3
4
5
6
7
8
|
<mvc:interceptors>
<mvc:interceptor>
<mvc:mapping path="/**"/>
<bean class="mvc.interceptor.MyInterceptor1"></bean>
</mvc:interceptor>
</mvc:interceptors>
|
说明:
<mvc:mapping path="/**"/>表示对所有资源进行拦截<bean class="mvc.interceptor.MyInterceptor1"></bean>即为注入的拦截器类
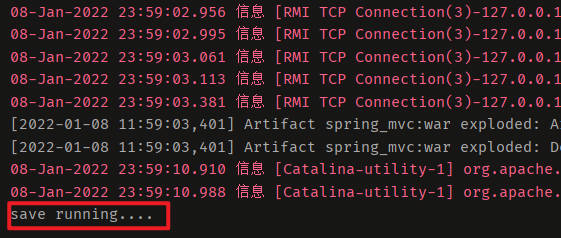
启动tomcat服务,浏览器访问http://localhost:8080/target,可以看控制台的打印结果顺序:

由此就可以做一些网站登录拦截等的操作了。
下面对preHandle()方法做一个简单演示:
在/src/main/webapp/jsp下新建一个error.jsp文件:
1
2
3
4
5
6
7
8
9
| <%@ page contentType="text/html;charset=UTF-8" language="java" %>
<html>
<head>
<title>Title</title>
</head>
<body>
<h1>error</h1>
</body>
</html>
|
编写MyInterceptor1类中的preHandle()方法:
1
2
3
4
5
6
7
8
9
10
11
12
13
14
15
16
17
18
19
20
21
22
23
24
25
26
| public class MyInterceptor1 implements HandlerInterceptor {
@Override
public boolean preHandle(HttpServletRequest request, HttpServletResponse response, Object handler) throws Exception {
System.out.println("perHandle....");
String param = request.getParameter("param");
if ("yes".equals(param)) {
return true;
} else {
request.getRequestDispatcher("/jsp/error.jsp").forward(request,response);
return false;
}
}
@Override
public void postHandle(HttpServletRequest request, HttpServletResponse response, Object handler, ModelAndView modelAndView) throws Exception {
System.out.println("postHandle....");
}
@Override
public void afterCompletion(HttpServletRequest request, HttpServletResponse response, Object handler, Exception ex) throws Exception {
System.out.println("afterCompletion....");
}
}
|
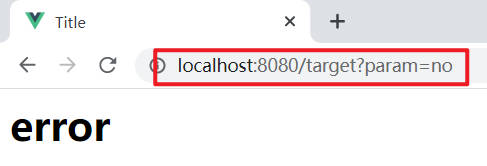
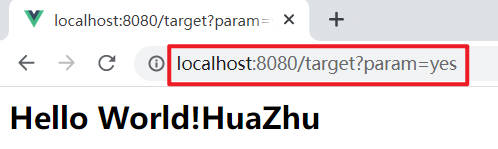
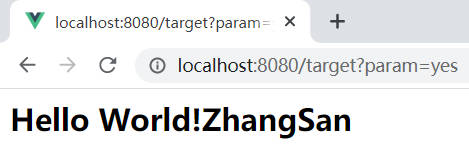
说明:浏览器访问target资源,如果url中携带param=yes,则可以正常跳转,否则返回error页面
启动tomcat服务。
浏览器首先访问:http://localhost:8080/target?param=no,可以看到被拦截
再访问:http://localhost:8080/target?param=yes,可以看到正常跳转
postHandle()方法中有modelAndView参数,说明可以对其进行相应的修改工作,举个例子,编写MyInterceptor1类中的postHandle()方法:
1
2
3
4
5
6
7
8
9
10
11
12
13
14
15
16
17
18
19
20
21
22
23
24
25
26
27
| public class MyInterceptor1 implements HandlerInterceptor {
@Override
public boolean preHandle(HttpServletRequest request, HttpServletResponse response, Object handler) throws Exception {
System.out.println("perHandle....");
String param = request.getParameter("param");
if ("yes".equals(param)) {
return true;
} else {
request.getRequestDispatcher("/jsp/error.jsp").forward(request,response);
return false;
}
}
@Override
public void postHandle(HttpServletRequest request, HttpServletResponse response, Object handler, ModelAndView modelAndView) throws Exception {
modelAndView.addObject("name","ZhangSan");
System.out.println("postHandle....");
}
@Override
public void afterCompletion(HttpServletRequest request, HttpServletResponse response, Object handler, Exception ex) throws Exception {
System.out.println("afterCompletion....");
}
}
|
说明:将name的值由原来TargetController类中定义的HuaZhu,修改为ZhangSan
启动tomcat服务,浏览器访问:http://localhost:8080/target?param=yes,结果如下:
多个拦截器的执行顺序
假设再配置一个拦截器,编写MyInterceptor2类:
1
2
3
4
5
6
7
8
9
10
11
12
13
14
15
16
17
18
19
20
21
22
23
| import org.springframework.web.servlet.HandlerInterceptor;
import org.springframework.web.servlet.ModelAndView;
import javax.servlet.http.HttpServletRequest;
import javax.servlet.http.HttpServletResponse;
public class MyInterceptor2 implements HandlerInterceptor {
@Override
public boolean preHandle(HttpServletRequest request, HttpServletResponse response, Object handler) throws Exception {
System.out.println("perHandle2222....");
return true;
}
@Override
public void postHandle(HttpServletRequest request, HttpServletResponse response, Object handler, ModelAndView modelAndView) throws Exception {
System.out.println("postHandle2222....");
}
@Override
public void afterCompletion(HttpServletRequest request, HttpServletResponse response, Object handler, Exception ex) throws Exception {
System.out.println("afterCompletion2222....");
}
}
|
在spring-mvc.xml配置文件中配置该拦截器:
1
2
3
4
5
6
7
8
9
10
11
12
13
|
<mvc:interceptors>
<mvc:interceptor>
<mvc:mapping path="/**"/>
<bean class="mvc.interceptor.MyInterceptor1"></bean>
</mvc:interceptor>
<mvc:interceptor>
<mvc:mapping path="/**"/>
<bean class="mvc.interceptor.MyInterceptor2"></bean>
</mvc:interceptor>
</mvc:interceptors>
|
注意:这里先配置拦截器一,再配置拦截器二
启动tomcat服务,浏览器访问:http://localhost:8080/target?param=yes,查看控制台打印信息
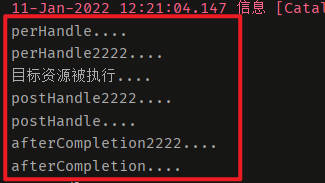
说明,执行顺序如下:
- 拦截器一的
preHandle()方法
- 拦截器二的
preHandle()方法
- 目标方法
- 拦截器二的
postHandle()方法
- 拦截器一的
postHandle()方法
- 拦截器二的
afterCompletion()方法
- 拦截器一的
afterCompletion()方法
小结:
| 方法名 |
说明 |
preHandle() |
方法将在请求处理之前进行调用,该方法的返回值是布尔值Boolean类型的,当它返回为false时,表示请求结束,后续的Interceptor和Controller都不会再执行;当返回值为true时就会继续调用下一个Interceptor的preHandle方法 |
postHandle() |
该方法是在当前请求进行处理之后被调用,前提是preHandle方法的返回值为true时才能被调用,且它会在DispatcherServlet进行视图返回渲染之前被调用,所以我们可以在这个方法中对Controller处理之后的ModelAndView对象进行操作 |
afterCompletion() |
该方法将在整个请求结束之后,也就是在DispatcherServlet渲染了对应的视图之后执行,前提是preHandle方法的返回值为true时才能被调用 |
异常处理
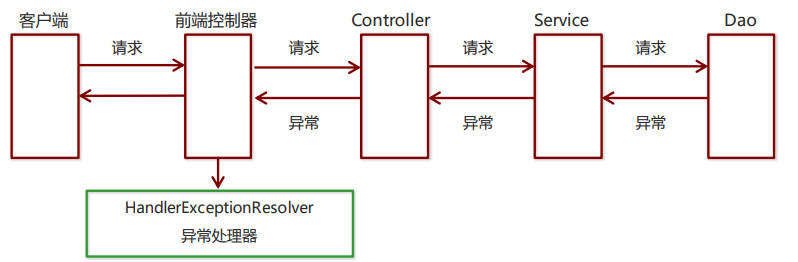
系统的Dao、Service、Controller出现都通过throws Exception向上抛出,最后由SpringMVC前端控制器交 由异常处理器进行异常处理,如下图:
简单环境搭建:
在/src/main/java/mvc目录下新建exception文件夹,在其中编写一个自定义MyException类:
1
2
| public class MyException extends Exception{
}
|
在/src/main/java/mvc/service目录下新建接口DemoService,并在/impl文件夹下编写其实现类DemoServiceImpl:
1
2
3
4
5
6
7
8
9
10
11
12
13
14
| import mvc.exception.MyException;
import java.io.FileNotFoundException;
public interface DemoService {
void show1();
void show2();
void show3() throws FileNotFoundException;
void show4();
void show5() throws MyException, MyException;
}
|
1
2
3
4
5
6
7
8
9
10
11
12
13
14
15
16
17
18
19
20
21
22
23
24
25
26
27
28
29
30
31
32
33
34
35
36
37
38
39
| import mvc.exception.MyException;
import mvc.service.DemoService;
import java.io.FileInputStream;
import java.io.FileNotFoundException;
import java.io.InputStream;
public class DemoServiceImpl implements DemoService {
@Override
public void show1() {
System.out.println("抛出类型转换异常....");
Object str = "zhangsan";
Integer num = (Integer)str;
}
@Override
public void show2() {
System.out.println("抛出除零异常....");
int i = 1/0;
}
@Override
public void show3() throws FileNotFoundException {
System.out.println("文件找不到异常....");
InputStream in = new FileInputStream("C:/xxx/xxx/xxx.txt");
}
@Override
public void show4() {
System.out.println("空指针异常.....");
String str = null;
str.length();
}
@Override
public void show5() throws MyException {
System.out.println("自定义异常....");
throw new MyException();
}
}
|
说明:这里分别实现了类型转换异常、除零异常、文件找不到异常、空指针异常以及自定义异常
在/src/main/java/mvc/controller目录下编写DemoController类:
1
2
3
4
5
6
7
8
9
10
11
12
13
14
15
16
17
18
19
20
21
22
23
24
| import mvc.service.DemoService;
import org.springframework.beans.factory.annotation.Autowired;
import org.springframework.stereotype.Controller;
import org.springframework.web.bind.annotation.RequestMapping;
import org.springframework.web.bind.annotation.RequestParam;
@Controller
public class DemoController {
@Autowired
private DemoService demoService;
@RequestMapping("/show")
public String show() throws Exception {
System.out.println("show running....");
demoService.show1();
return "index";
}
}
|
在applicationContext.xml配置文件中注入DemoService:
1
| <bean id="demoService" class="mvc.service.impl.DemoServiceImpl"></bean>
|
启动tomcat服务,在浏览器访问http://localhost:8080/show,出现如下报错信息页(类型转换异常):

简单异常处理器
SpringMVC已经定义好了该类型转换器,在使用时可以根据项目情况进行相应异常与视图的映射配置。
首先在/src/main/webapp/jsp目录下编写error.jsp:
1
2
3
4
5
6
7
8
9
| <%@ page contentType="text/html;charset=UTF-8" language="java" %>
<html>
<head>
<title>Title</title>
</head>
<body>
<h1>通用的错误提示页</h1>
</body>
</html>
|
在spring-mvc.xml配置文件中配置异常处理器:
1
2
3
4
|
<bean class="org.springframework.web.servlet.handler.SimpleMappingExceptionResolver">
<property name="defaultErrorView" value="error"></property>
</bean>
|
说明:
- 这里是配置默认错误视图
name="defaultErrorView"
value="error"指的是跳转的视图(这里做过前后缀的配置)
启动tomcat服务,在浏览器访问http://localhost:8080/show,就会跳转到编写的错误提示页了:
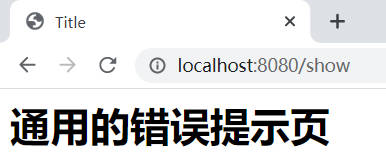
也可以根据错误类型配置不同的异常处理器,使得浏览器跳转至不同的错误页面。
下面以类型转换异常和自定义异常为例:
在/src/main/webapp/jsp目录下编写error1.jsp和error2.jsp:
1
2
3
4
5
6
7
8
9
| <%@ page contentType="text/html;charset=UTF-8" language="java" %>
<html>
<head>
<title>Title</title>
</head>
<body>
<h1>类型转换异常</h1>
</body>
</html>
|
1
2
3
4
5
6
7
8
9
| <%@ page contentType="text/html;charset=UTF-8" language="java" %>
<html>
<head>
<title>Title</title>
</head>
<body>
<h1>自定义异常</h1>
</body>
</html>
|
在spring-mvc.xml配置文件中配置异常处理器:
1
2
3
4
5
6
7
8
9
|
<bean class="org.springframework.web.servlet.handler.SimpleMappingExceptionResolver">
<property name="exceptionMappings">
<map>
<entry key="java.lang.ClassCastException" value="error1"></entry>
<entry key="mvc.exception.MyException" value="error2"></entry>
</map>
</property>
</bean>
|
说明:这里根据异常类型分别配置不同的异常跳转
首先在DemoController类中放开show1()方法(类型转化异常),启动tomcat服务,浏览器访问http://localhost:8080/show,结果如下:

然后在DemoController类中放开show5()方法(自定义异常),启动tomcat服务,浏览器访问http://localhost:8080/show,结果如下:
自定义异常处理
步骤:
- 创建异常处理器类实现
HandlerExceptionResolver
- 配置异常处理器
- 编写异常页面
- 测试异常跳转
在/src/main/java/mvc/resolver目录下编写MyExceptionResolver类:
1
2
3
4
5
6
7
8
9
10
11
12
13
14
15
16
17
18
19
20
21
22
23
24
25
26
27
28
| import mvc.exception.MyException;
import org.springframework.web.servlet.HandlerExceptionResolver;
import org.springframework.web.servlet.ModelAndView;
import javax.servlet.http.HttpServletRequest;
import javax.servlet.http.HttpServletResponse;
public class MyExceptionResolver implements HandlerExceptionResolver {
@Override
public ModelAndView resolveException(HttpServletRequest httpServletRequest, HttpServletResponse httpServletResponse, Object o, Exception e) {
ModelAndView modelAndView = new ModelAndView();
if(e instanceof MyException){
modelAndView.addObject("info","自定义异常");
}
else if(e instanceof ClassCastException){
modelAndView.addObject("info","类转换异常");
}
modelAndView.setViewName("error");
return modelAndView;
}
}
|
说明:这里可以获取不同类型的异常对象,并对其进行操作,最后可以通过modelAndView对象返回视图
在spring-mvc.xml中配置自定义异常处理器:
1
| <bean class="mvc.resolver.MyExceptionResolver"></bean>
|
改写error.jsp:
1
2
3
4
5
6
7
8
9
10
| <%@ page contentType="text/html;charset=UTF-8" language="java" %>
<html>
<head>
<title>Title</title>
</head>
<body>
<h1>通用的错误提示页</h1>
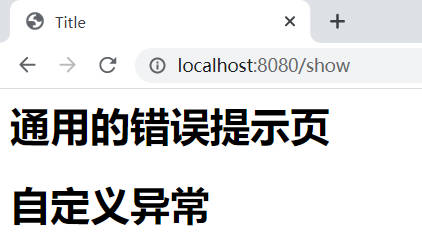
<h1>${info}</h1>
</body>
</html>
|
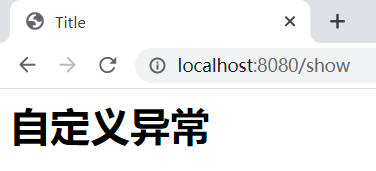
启动tomcat服务,在浏览器访问http://localhost:8080/show,可以根据不同的异常返回不同的信息(这里报DemoController类中show5()方法的自定义异常):
更多可以通过异常处理记录日志信息
后记
边学边捡起抛在脑后一年半的东西。。。。
 微信
微信 支付宝
支付宝